With this command you can automatically create profile cuttings on bars or bar projections. Once you have selected an object to be trimmed, you can choose the boundary objects in a dialog box and assign the cuttings to the relevant component.
When you execute the command, the following appears:
Input request
Select bar for cutting:
Use the mouse to choose the bar you wish to cut. At this point you can only choose one object. After selecting the object, the Profile cutting dialog box appears.
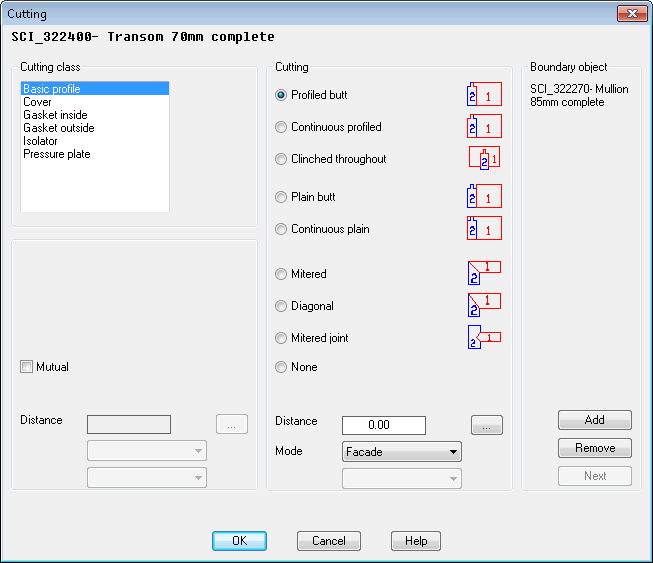
Dialog box Profile cutting
db_ath_st3d_stoss
Dialog box section Cutting class
List Displays the cutting classes of the selected bar (assembly) assigned to the components. Here, mark one or more components and select a cutting.
Mutual Causes the boundary object also to be trimmed. This option is often used for diagonal cuts and miter cuts. The following cuttings are used for the boundary object.
Butt-joining bar
Boundary object
Profiled butt Continuously profiled Notched throughout
Plain butt Continuous plain
Mitered Diagonal Mitered joint
Continuously profiled Profiled butt Mutual not possible
Continuous plain Plain butt
Mitered Diagonal Mutual not possible
Distance Changes the distance of the boundary object by the entered value. A positive value shortens the component, a negative value lengthens it.
Selection menu Specifies a component as a notch. If a component has been identified as a component in a bar assembly, you can select this process here. The process notches the boundary object with the intersection of the joining bar. This is only possible with L-joints with the profiled cutting types. Furthermore, a component must have been defined as process for the boundary object.
Dialog box section Cutting
Determines the cutting of the marked components. For example, it is possible to have a straight butt joint between the mullion and transom cover sections while having a profiled fitted joint between the transom and the mullion themselves.
Profiled butt Cuts the marked component at the joint side of the boundary object and notches the bar end according to the cutting outline.
Continuously profiled Cuts the marked component at the opposite side of the boundary object and notches the bar end according to the cutting outline.
Notched throughout Notches the marked component according to the cutting outline of the boundary object.
Plain butt Cuts the marked component on the joint side of the boundary object.
Continuous plain Cuts the marked component on the opposite side of the boundary object.
Mitered Cuts the marked component for mitering (bisecting the angle).
Diagonal Cuts the marked component diagonally.
Mitered joint Joins the joining component with a mitered joint to a through-running component.
This cutting option is only available with T-joints. With I and L-joints the option is grayed out.
None Does not realize any cutting. If a cutting was defined for the component previously, it is removed.
Distance Changes the distance of the boundary object by the entered value. A positive value shortens the component, a negative value lengthens it.
Mode Defines the cutting mode for the joining component. The following cutting modes can be selected:
• With the joint cuttings Plain butt, Continuous plain:
– Basic - cuts the joining component to the enclosing rectangle of the cutting outline of the boundary object.
– Axis - cuts the joining component to the axis of the boundary object.
• With the cutting Profiled butt:
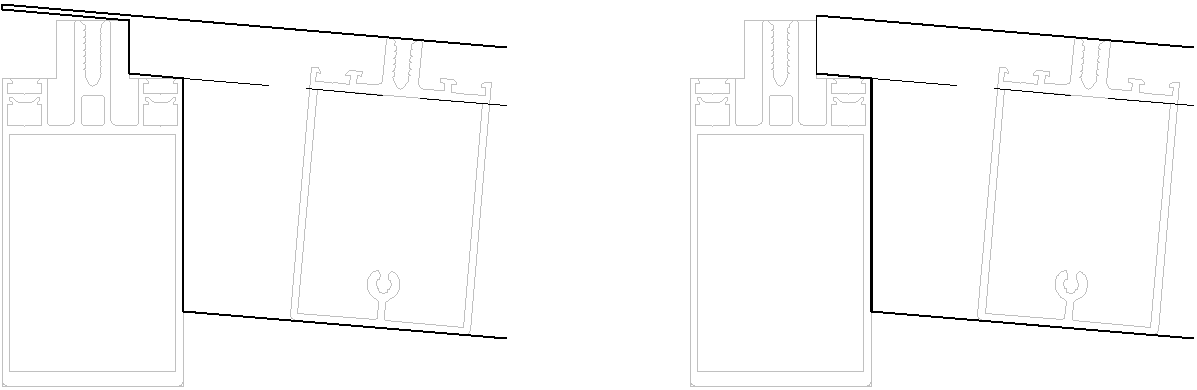
– Basic - cuts the joining component to the cutting outline of the boundary object. Protruding areas are cut off on the opposite side of the cutting outline.
– Facade - cuts the joining component to the cutting outline of the boundary object. Protruding areas are cut off on the joint side of the cutting outline.
Selection menu Specifies a component as a notch. If a component has been identified as a component in a bar assembly, you can select this process here. The process notches the boundary object with the intersection of the joining bar. This is only possible with T-joints with the profiled cutting types. Furthermore, a component must have been defined as process for the boundary object.
Dialog box section Boundary object
In the Boundary object section you can add or remove objects to which the selected bar is to be trimmed using the Add and Remove buttons. The Next button allows you to change between the selected boundary objects. The name of the active boundary object is displayed above the buttons. If you have only selected one boundary object, the Next button is hidden in gray.
If you close the dialog box with OK, the profile cutting is implemented on the selected bar.
Note
• You can use bars as well as infills as boundary objects.
• With this command you can also cut 2D projections from standard parts and semi-finished products.