Tab ATHENA Model > Group Data > Arrangement manager
Menu:
Modeling > Manage > Arrangement manager
Toolbar:
ATH Manager > Arrangement manager
Command input:
ath_raster_edit
With this function you can create, edit and manage bar arrangements for the assignment of assemblies to bars.
An arrangement defines the position, distribution and orientation of an assembly on a bar. Only one assembly is assigned to a bar arrangement. The arrangement is a rule which does not depend on the length of a bar, so the same arrangement can be used on different bars. The contained group is always positioned at a reference point or by a distribution on a section.
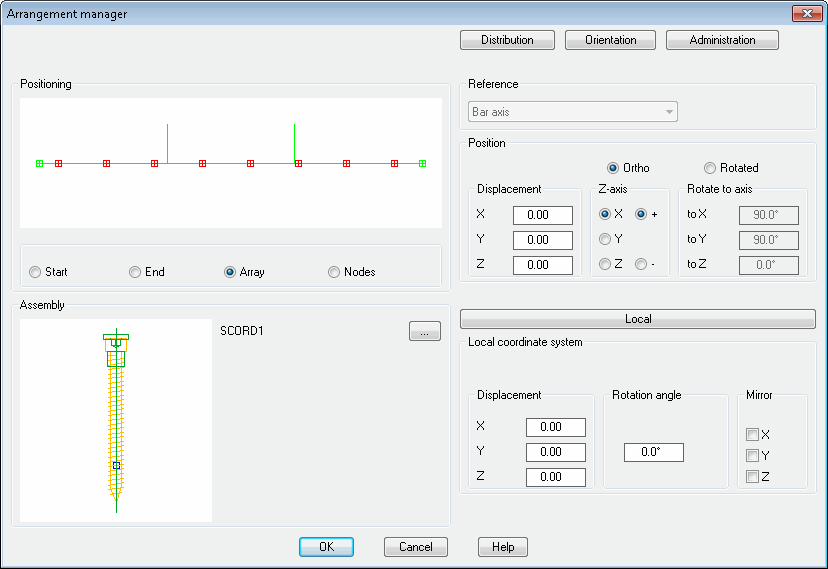
Dialog box Arrangement manager
On the left side of the dialog box you can see the general display section with a preview of the assembly arrangement. On the right there is the operating section with the register buttons Distribution, Orientation and Manager.
db_ath_raster_edit
Display section
Dialog box section Positioning
The preview displays the bar with its nodes and the current arrangement. When you click the button Orientation, a UCS symbol is also displayed in the preview.
Start Positions the element at the starting point of the bar.
End Positions the element at the end point of the bar.
Array Positions multiple elements distributed over the length of the whole bar.
Nodes Positions the element at each axis node on a bar.
Dialog box section Assembly
The preview shows the assembly aligned with the bar.
The viewing direction on the bar is towards the end of the bar for the positioning methods Start, Array and Nodes. With the End positioning mode the viewing direction is however from the end of the bar to the start of the bar.
[...] Opens the Dialog box For object selection, where you can select a saved assembly to attach it to the bar appropriate to the arrangement. Siehe Object selection. Here, irrespective of the structural depth of their included elements, assemblies are treated as a component.
Operating section
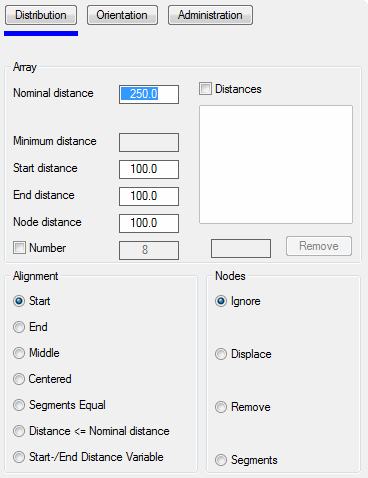
Register button Distribution
db_ath_raster_edit_verteilung
Dialog box section Array
Nominal distance Defines the basic spacing between the assemblies.
Minimum distance Defines the minimum spacing. If undercut, the minimum spacing initiates an action for the nodes that are to be taken into account.
Start/End Defines the distance to the start or end of the bar.
Node distance Defines the distance to the nodes.
Number Activates an input field where you can define the number of assemblies. After activation, enter the required number into the input field.
Distances Activates the distances list. Here, you can define irregular distributed distances. In each case enter the distance to the starting point in the input field below the list.
Remove Deletes the marked distance from the distances list.
Dialog box section Alignment
Start Aligns the components starting at the start of the bar.
End Aligns the components starting at the end of the bar.
Middle Aligns the components uniformly about the center of the bar. An even number of components is always produced.
Centered Aligns a component at the center of the bar and distributes the other components uniformly on both sides. An odd number of components is always produced.
Segments equal Produces a distribution with equal segments. The distances are calculated from the specified number.
Distance <= Nominal distance Produces a distribution with fixed start and end distances. The distances are calculated from the specified start and end distances as well as from the nominal distance.
Start/end distance variable Produces a distribution with variable start and end distances. The distances are calculated from the specified nominal distance.
Dialog box section Nodes
In this section you can specify the reaction to the existing nodes.
Ignore Ignores existing nodes.
Displace Gives the distance to the nodes more priority; here, the nominal distance does not have to be maintained.
Remove Removes all components which collide with the nodes due to the set distances.
Segments Deals with the sections between the nodes as separate distributions.
Dialog box section Apply
Number Defines the number of assemblies. If the specified number is greater than that computed according to the distribution rules, the entry is not taken into account.
Profile Defines that the arrangement acts on the bars.
Infill Defines that the arrangement also acts on infills which border the selected bar. Example: You want to fit a point support at each bar node and the pane is to receive mounting holes at the appropriate locations.
Dialog box section Bar
The bar parameters defined here only act on the preview. In this way you can set up a realistic representation of your situation.
Length Defines the length of the bar.
Number of nodes Defines the number of nodes for the bar.
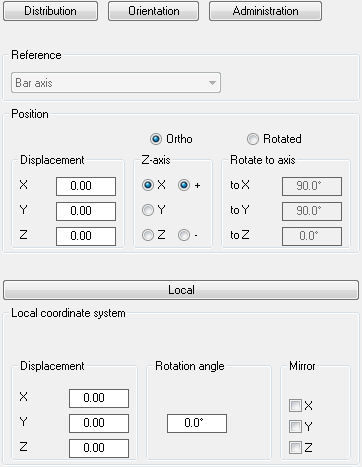
Register button Orientation
db_ath_raster_edit_orientierung
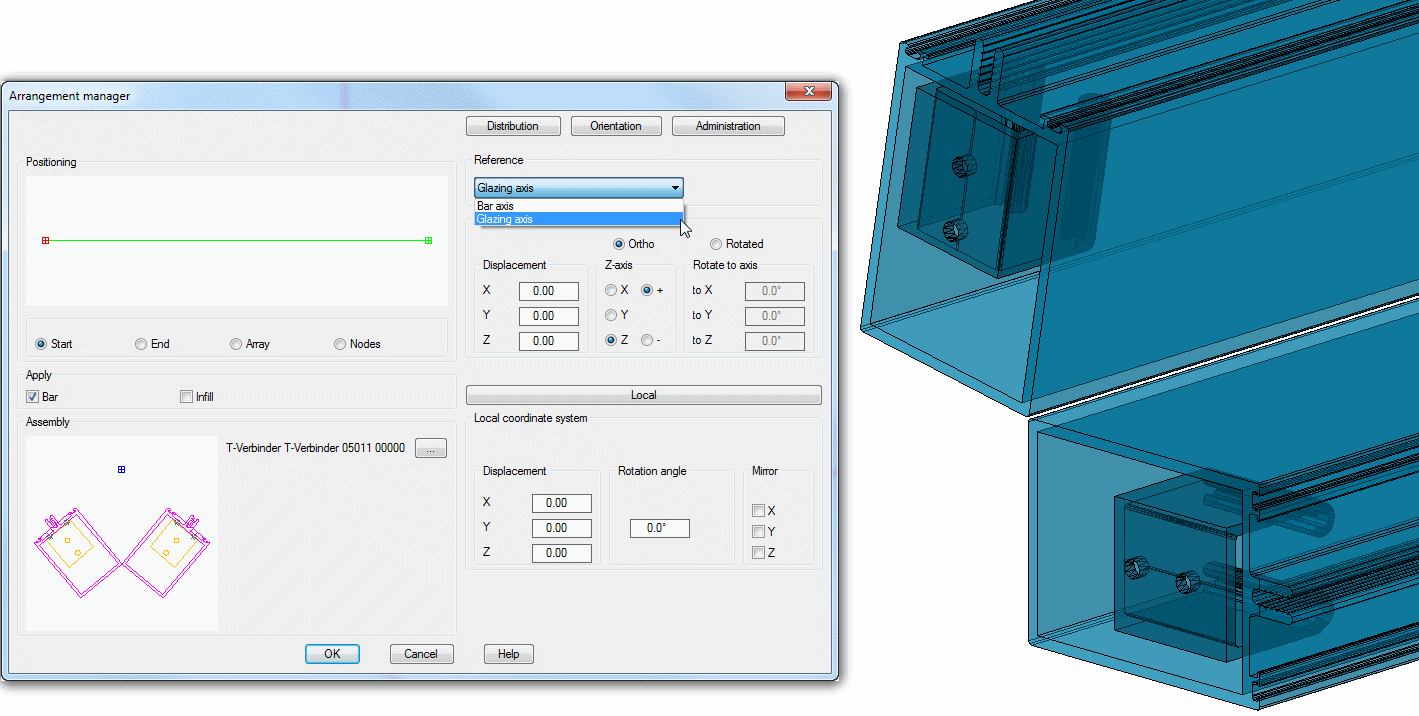
Dialog box section Reference
Defines the reference of the arrangement. This section is enabled for variable bar assemblies with several glazing axes (e.g. corner transoms for variable angles). You can then choose whether the arrangement is referenced to the bar axis or the glazing axis.
Joint component with pair of transoms with variable angle.
Dialog box section Position
In this section the position and orientation of the component coordinate system are described. All details are determined relative to the bar coordinate system, whose origin is the set reference point.
The orientation of this coordinate system can be specified orthogonally or rotated to the reference system. The orthogonal specification means that: All axes remain parallel to the reference system and just the axis definitions (+/-X, +/-Y, +/-Z) change. The rotated specification means that: The coordinate system is rotated about the coordinate axes at its origin.
Elements in a coordinate system positioned through rotation (!=90°) are not displayed in the preview.
Drop-down menu Local coordinate system
Activates the section Local coordinate system. Here the position and orientation of the component in its coordinate system are described. All details are described relative to the component coordinate system. Coordinate figures, rotation angle and mirroring are available.
The positioning of the component using one of the two descriptions is not sufficient in most cases. For more complex groupings it may be more helpful if a number of local coordinate systems are aligned using a basic coordinate system
Register button Manager
You will find a detailed description of the functions of the manager in the Chapter Management of objects.
End of program
OK closes the dialog box and the changes are saved for the duration of the drawing session.
Cancel closes the dialog box and discards the changes.