You can create, edit and manage bar joints with this function.
A bar joint determines the joining of bars which meet one another. Cuttings and assemblies can be applied here.
The way in which bars come together differs. A differentiation is made between three types, longitudinal joint (I), corner joint (L) and center joint (T). This differentiation is necessary to specify the application and the possibilities associated with it.
• the I joint: I-shaped joint of two bars.
• the L joint: L-shaped joint of two bars at the ends, irrespective of their included dihedral angle.
• the T joint: T-shaped joint of two bars (one bar runs through, the other butts against it).
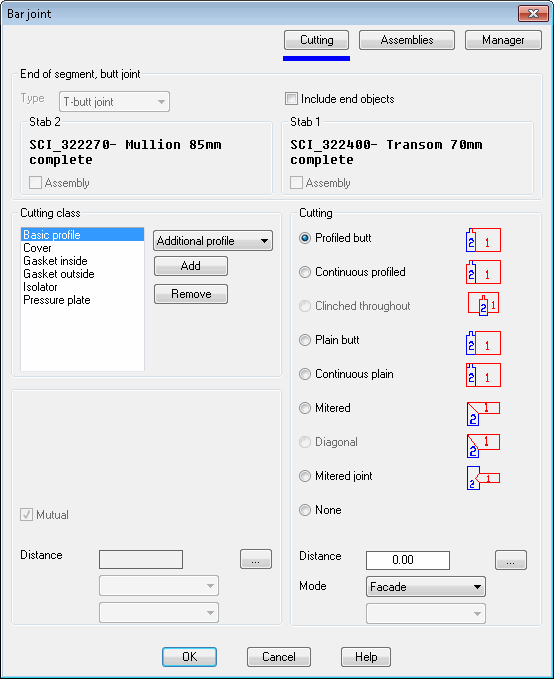
Dialog box Bar joint
The dialog box contains the following register buttons:
Type Defines the initial situation of the joint and thus its possibilities. When you call this dialog box via the function Assign bar joint, the type is automatically recognized.
Include end objects Has the effect that the situation defined for the T-butt joint is also implemented for the L-butt joint. The option Include end objects is released via the function call Determine bar joint.
Other options are shown for information and can be changed in the Assemblies section.
Dialog box section Cutting class
List Displays the cutting classes of the selected bar assigned to the components. Here, mark one or more objects and select a cutting.
Selection menu Shows the cutting types currently present in the document. You will find more about the topic under Cutting.
Add Adds the selected cutting type to the list.
Remove Removes the cutting type marked in the list.
Mutual Also processes the boundary object. This tick box is often activated for the cuttings, Mitered and Diagonal. The following cuttings are used for the boundary object.
Butt-joining bar
Boundary object
Profiled butt Continuously profiled Notched throughout
Plain butt Continuous plain
Mitered Diagonal Mitered joint
Continuously profiled Profiled butt Mutual not possible
Continuous plain Plain butt
Mitered Diagonal Mutual not possible
The description for the other options (Distance, Mode...) can be found further below in this section.
Dialog box section Cutting
Here you assign a cutting to the individual components. For example, it is possible to have a straight butt joint between the mullion and transom cover sections while having a profiled fitted joint between the transom and the mullion themselves.
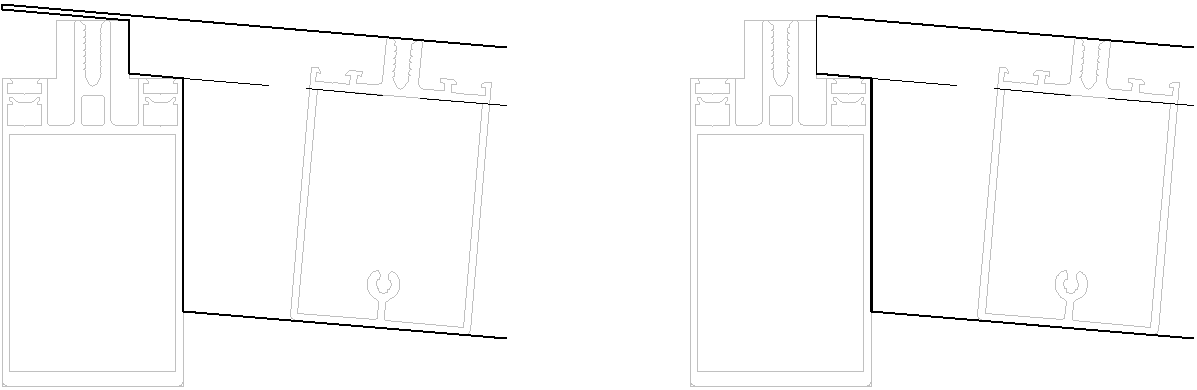
Profiled butt Cuts the marked component at the joint side of the boundary object and notches the bar end according to the cutting outline.
Continuously profiled Cuts the marked component at the opposite side of the boundary object and notches the bar end according to the cutting outline.
Notched throughout Notches the marked component according to the cutting outline of the boundary object.
Plain butt Cuts the marked component on the joint side of the boundary object.
Continuous plain Cuts the marked component on the opposite side of the boundary object.
Mitered Cuts the marked component for mitering (bisecting the angle).
Mitered joint Joins the joining component with a mitered joint to a through-running component.
This cutting option is only available with T-joints. With I and L-joints the option is grayed out.
Diagonal Cuts the marked component diagonally.
None Does not realize any cutting. If a cutting was defined for the component previously, it is removed.
Distance Shortens the joining component by the entered distance. Enter a negative value to lengthen the component.
Mode Defines the cutting mode for the joining component. The following cutting modes can be selected:
• With the joint cuttings Plain butt, Continuous plain:
– Basic - cuts the joining component to the enclosing rectangle of the cutting outline of the boundary object.
– Axis - cuts the joining component to the axis of the boundary object.
• With the cutting Profiled butt:
– Basic - cuts the joining component to the cutting outline of the boundary object. Protruding areas are cut off on the opposite side of the cutting outline.
– Facade - cuts the joining component to the cutting outline of the boundary object. Protruding areas are cut off on the joint side of the cutting outline.
Selection menu Specifies a component as a notch. If a component has been identified as a component in a bar assembly, you can select this process here. The process notches the boundary object with the intersection of the joining bar.
This is only possible with T-joints with the profiled cutting. Furthermore, a component must have been defined as process for the boundary object.
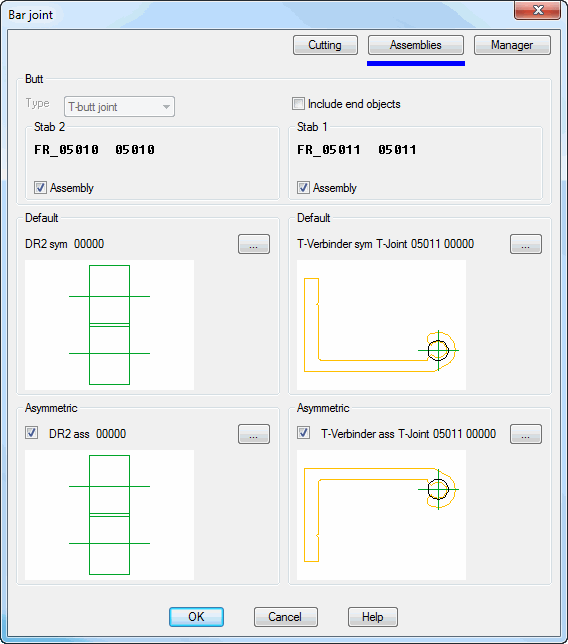
Register button Bar assemblies
db_ath_c3d_join_edit-baugruppen
Dialog box section Butt
Type Defines the initial situation of the joint and thus its possibilities. When you call this dialog box via the function Assign bar joint, the type is automatically recognized.
Assembly Defines that an assembly is assigned to the bar for the joint. You can select the assembly from the pull-down list or by clicking the button [...].