Creates associative labels of coordinate points which are related to a defined base point (coordinate origin).
Input request
Select dimension system or [New] <New>:
Select the origin or a coordinate label of an existing system in order to supplement other coordinate labels. Choose the option New to create a new dimension system.
Enter coordinate origin:
Specify the origin of the coordinate dimension system. This input request only appears when you have called the option New beforehand. Once you have specified the origin, the Dialog box Coordinate labeling appears, where you can carry out further settings.
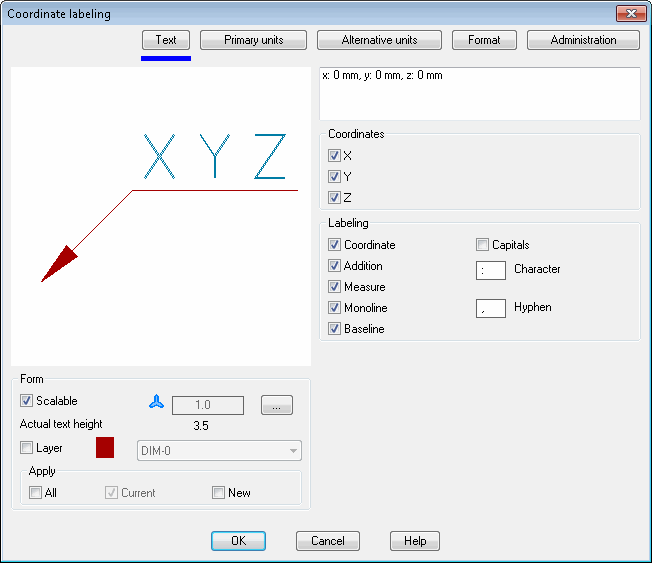
Dialog box Coordinate labeling
The dialog box appears when you have specified the coordinate origin or when you call the Settings option.
In the dialog box you will find on the left side the display section with the preview. On the right side you will see the operating section. You can activate the individual function areas with register buttons.
db_ath_dim_coord
Display section
The display section shows a schematic preview of the current label.
Below the preview you will find options for changing the display. You will find further information on this in the section Display options for labels.
Dialog box section Apply
The tick boxes in this region only affect the display settings (layer and scaling). All other settings (coordinates, units, etc.) have an effect on all coordinate labels of the dimension system.
All Transfers the changes on editing a coordinate label to all objects of the dimension system.
Current Is always switched on and changes only the selected coordinate label.
New Changes both the current (Current tick box is always active) and the new coordinate labels of the dimension system.
Operating section
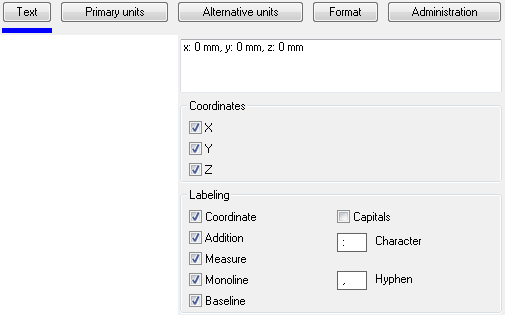
Register button Text
db_ath_dim_coord_text
Dialog box section Coordinates
X Specifies the value of the X coordinate in the coordinate label.
Y Specifies the value of the Y coordinate in the coordinate label.
Z Specifies the value of the Z coordinate in the coordinate label.
Dialog box section Labeling
Coordinate Switches the designation of the coordinates (X, Y, Z) on or off.
Capitals Displays the coordinates as capital letters.
Addition Switches the additional symbol () on or off.
Character Defines the delimiting character between coordinates and coordinate value.
Measure Turns unit of the coordinates on or off.
Monoline Labels the coordinates in one line.
Separator Defines the delimiting character between the coordinates.
Baseline Turns the leader baseline on or off.
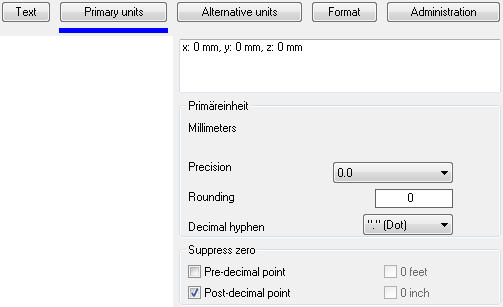
Register button Primary units
db_ath_dim_coord_primaereinheit
Dialog box section Primary units
Displays the units set in the drawing.
You can change the units of the drawing with the AutoCAD command Units (_units).
Precision Defines the accuracy (number of decimal places) for primary units.
Rounding Determines the rounding rules for the primary units. If you enter the value 0.25 here, all distances are rounded to the nearest quarter level. If you enter the value 1.0, all distances are rounded to the nearest integer number. The number of figures after the decimal separator depends on the Precision setting.
Decimal separator Defines the decimal separator.
Dialog box section Suppress zero
Pre-decimal point Suppresses leading zeros in decimal dimensions. For example, 0.500 becomes .500.
Post-decimal point Suppresses following zeros in decimal dimensions. For example, 0.500 becomes 0.5.
0 foot Suppresses stating feet for dimensions in feet and inches when the distance is shorter than one foot. For example, 0'-6 1/2" becomes 6 1/2".
0 inch Suppresses stating inches for dimensions in feet and inches when the distance is an integer in feet. For example, 1'-0" becomes 1'.
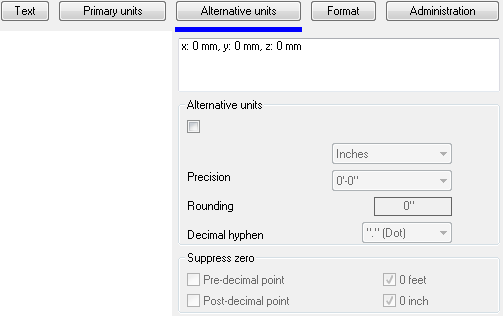
Register button Alternative units
db_ath_dim_coord_alternativeinheit
Dialog box section Alternative units
Switches on alternative units.
If you have set decimal units, units with inches are used as alternative units. If you have set units with inches, decimal alternative units are used.
Precision Defines the accuracy (number of decimal places) for alternative units.
Rounding Determines the rounding rules for the alternative units. If you enter the value 0.25 here, all distances are rounded to the nearest quarter level. If you enter the value 1.0, all distances are rounded to the nearest integer number. The number of figures after the decimal separator depends on the Precision setting.
Decimal separator Defines the decimal separator.
Dialog box section Suppress zero
Pre-decimal point Suppresses leading zeros in decimal dimensions. For example, 0.500 becomes .500.
Post-decimal point Suppresses following zeros in decimal dimensions. For example, 0.500 becomes 0.5.
0 foot Suppresses stating feet for dimensions in feet and inches when the distance is shorter than one foot. For example, 0'-6 1/2" becomes 6 1/2".
0 inch Suppresses stating inches for dimensions in feet and inches when the distance is an integer in feet. For example, 1'-0" becomes 1'.
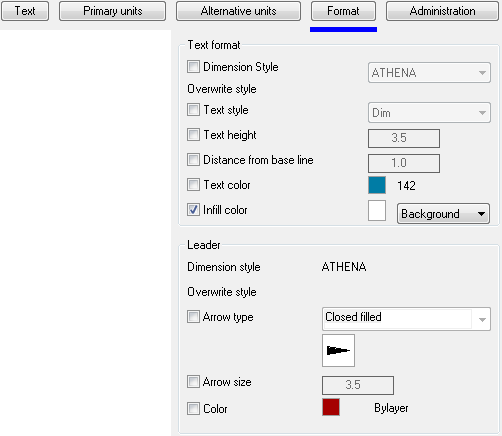
Register button Format
db_ath_dim_coord_format
Dialog box section Text format
For leader texts the settings of the current dimension style are used as standard. Here, you can overwrite single style settings.
Dimension style Switches in replacement of the dimension style. If you activate this tick box, you can select a dimension style from the list.
Text style Switches in replacement of the text style. If you activate this tick box, you can select a text style from the list.
Text height Switches in replacement of the text height. When you activate this tick box, you can define a new text height in the input field.
The text height defined here is multiplied by the dimension scale factor.
Distance from base line Switches in replacement of the distance between the text and the base line. When you activate this tick box, you can define a new distance in the input field.
The distance defined here is defined by the dimension scale factor.
Text color Switches in replacement of the text color. When you activate this tick box, you can define a new text color by clicking the color button.
Infill color Switches in replacement of the infill color of the leader text. When you activate this tick box, you can define a new infill color by clicking the color button.
Dialog box section Leader
For leader lines the settings of the current dimension style are used as standard. Here, you can overwrite single style settings.
Dimension style Displays the dimension style used for information.
Arrow tip Switches in replacement of the arrow tip. If you activate this tick box, you can select a new arrow type from the list.
Arrow size Switches on replacement of the arrow size. When you activate this tick box, you can define an arrow size in the input field.
Color Switches on replacement of the arrow color. When you activate this tick box, you can define a new arrow color by clicking the color button.
For color changes the dialog box Color is started. You will find further information on this subject in the AutoCAD documentation.
End of program
When you quit the dialog box with OK, the settings are saved for the duration of the drawing session. The positioning of the coordinate label occurs according to the same syntax as described in the command Leader:
Input request
Specify start point or [Settings]:
Specify the point of the coordinate which you want to label. This point corresponds to the arrow tip if you are labeling with leader lines.
Specify the next point of the leader:
Specify the next point (first kink point of the leader line) of the label. Press the Enter key if you only want to produce a text as coordinate label.
Specify the next point of the leader:
Specify the next point (next kink point of the leader line). This input request is repeated until you press the Enter key to terminate the command.