Tab ATHENA Model > Group Apply > Apply processes to infill
Menu:
Modeling > Apply > Apply processes to infill
Toolbar:
ATH Apply > Apply processes to infill
Command input:
ath_panel_hole
With this routine you can attach processes to existing infills (glazing or panels). With multilayer infills these processes can be applied specifically to single layers.
Input request
Select infill:
Select the infill to which you want to assign processes.
After the object selection a dialog box appears in which you can define the processes. Where the selected infill already possesses processes, these are displayed.
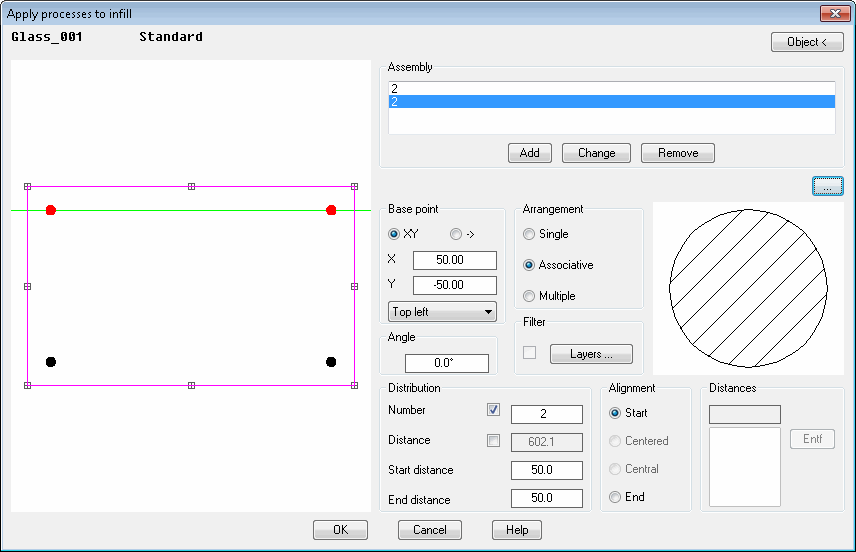
Dialog box Apply processes to infill
db_ath_panel_hole
Dialog box section Graphics
In the display box all assemblies are shown which have been used with this function.
Dialog box section Assembly
The list shows the processes which are assigned to the current infill. You can select the processes in the list in order to change their properties.
Add Adds the current processing definition to the list (selected sheet surface).
Modify Replaces the marked entry in the list with the current processing definition.
Remove Removes the selected process from the list.
The positioning of the assemblies always occurs along a construction line which is determined by the base point, angle and reference point. The intersection points of this line with the delimiting axes of the panel represent the computational basis for the distribution of the assemblies.
Dialog box section Base point
Specifies the base point used for the process. Enter the X and Y coordinates in the appropriate input fields. Since a process can also be applied many times in a straight line, a line is displayed in the preview. The coordinates refer to the reference point which you can select from the list. The changes only become effective when you click the button Modify.
Angle Defines the angle of the process. The rotation occurs in the counterclockwise direction. The changes only become effective when you click the button Modify.
Elevation The display provides a visual check of the current process. The insertion point of the process is identified in color.
Dialog box section Arrangement
Single Arranges the processes once at the defined base point on the current surface.
Associative Arranges processes regularly, according to the defined distribution, on a straight processing line on the current surface. With the associative arrangement additional dialog box sections are released where you can define the distribution rules.
Multiple Arranges processes irregularly, according to the defined distances, on a straight processing line on the current surface. With the multiple arrangement an additional dialog box section is released where you can define the distances.
Distance Defines the spacing between the processes.
Start distance Defines the distance of the process from the start of the infill.
End distance Defines the distance of the process from the end of the infill.
Dialog box section Alignment
Start Sets the starting point of the process series taking into account the starting distance at the start of the infill.
Center Centers an odd number of processes on the surface. The automatic system included prevents the specification of an even number of processes.
Middle Positions an even number of processes centrally on the infill. The automatic system included prevents the specification of an odd number of processes.
End Sets the starting point of the process series taking into account the starting distance at the end of the infill.
Dialog box section Distances
Defines the spacing of the processes. Enter in each case the spacing of the processes in the input field and confirm them to transfer them into the list.
Remove Removes the selected entry from the list.
OK terminates the dialog box and applies the processes to the selected infill. Cancel closes the dialog box and discards the processes.