You can create pipes with this command. In the dialog box products from various manufacturers are made available and can be inserted into the drawing and combined.
Dialog box Pipe
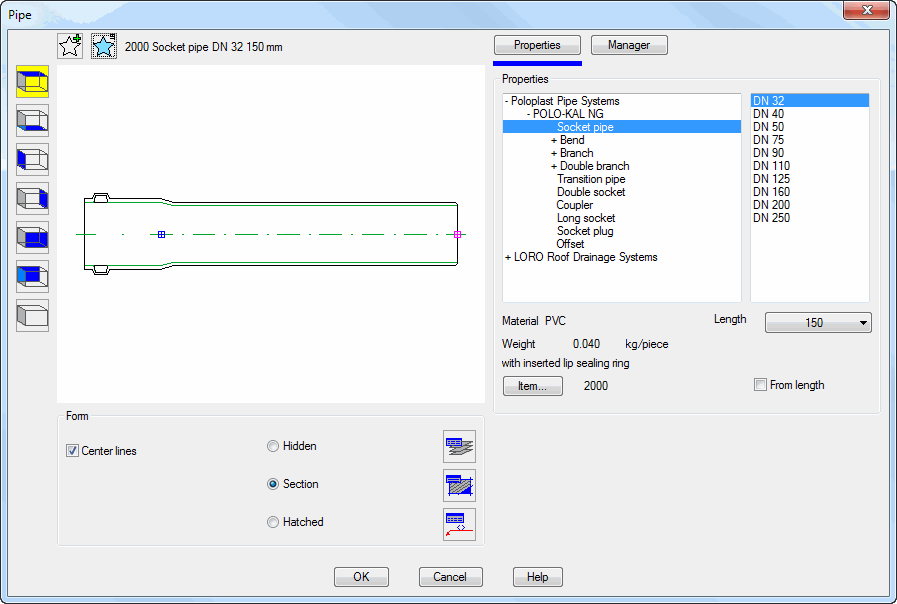
In the dialog box you will find on the left side the display section with the preview. On the right side you can see the operating section with the register buttons Properties and Manager. The properties are object specific; the manager is the same for all objects.
db_ath_pipe
Display section
At the top left there are two buttons for favorites. You will find further information on this in the section Saving and using favorites.
The preview is primarily intended for visual checks and shows the part with the set properties.
Register button Properties
The selected pipe is illustrated at the upper left as a preview. The preview largely corresponds to the actual pipe in the drawing.
Dialog box section Display
Axes Turns center lines of the pipe on or off.
Hidden Creates a pipe in a hidden view.
Section Creates a pipe in a sectioned view.
Hatched Creates a pipe in a sectioned view with a hatch.
Labeling Opens the Dialog box Label. You will find further information on this in the Chapter Labeling.
Operating section
Dialog box section Properties
List Shows the available pipe elements in a tree structure. Here you can select the required pipe element with the mouse. Closed branches in the tree structure are identified with +. Open branches are identified with -. Another list on the right side offers a choice of available nominal sizes.
Length Defines the length, if you have selected pipe elements.
Item Opens the Dialog box Item, where you can select an item number. You will find a detailed explanation on items in the Chapter Item.
From length Changes the insertion method and the behavior when stretching pipes. When the tick box is deactivated, the pipe is inserted with the selected length and cannot be extended beyond the selected length by stretching. With the tick box activated you can change the length after insertion. The pipe can also be stretched beyond the selected length up to the maximum available length.
Dialog box section Elevation
Side elevation Produces the side view of the selected pipe.
Front elevation Produces the front view of the selected pipe.
Plan Produces the plan view of the selected pipe.
End of program
The dialog box is closed with OK and you can insert the selected pipe into the drawing. The following procedure is used:
Input request
Specify insertion point or [Connection point/?]:
Use the mouse or enter coordinates to specify the insertion point of the pipe element.
You can connected the pipe element to an existing one with the Option Connection point. A further input request follows.
With the option ? you call the help.
Specify rotation angle or [Connection point/?]: <0>:
Use the mouse or enter an angle to specify the rotation angle.
Specify length [150...3000] or [?] <500>:
Use the mouse or enter co-ordinates to specify the length.
Option Connection point
Select object:
Select an existing pipe element on the desired side.
Specify a point for changing the connection or [Rotate/Move/?]:
Specify a point to change the connection (for example with branching). To do this, with the mouse click the appropriate connection side of the pipe element just inserted. This input request is repeated until you choose another option or terminate the command by pressing the Enter key.
With option Rotate you can rotate bends or sleeves in the other direction.
With the Option Move you can move the pipe element along the pipe alignment.
Option Move
Specify distance or [?] <0>:
Use the mouse or enter a value to specify a distance.