Tab ATHENA Model > Group Apply > Apply material outline
Menu:
Modeling > Apply > Apply material outline
Toolbar:
ATH Apply > Apply material outline
Command input:
ath_region_use
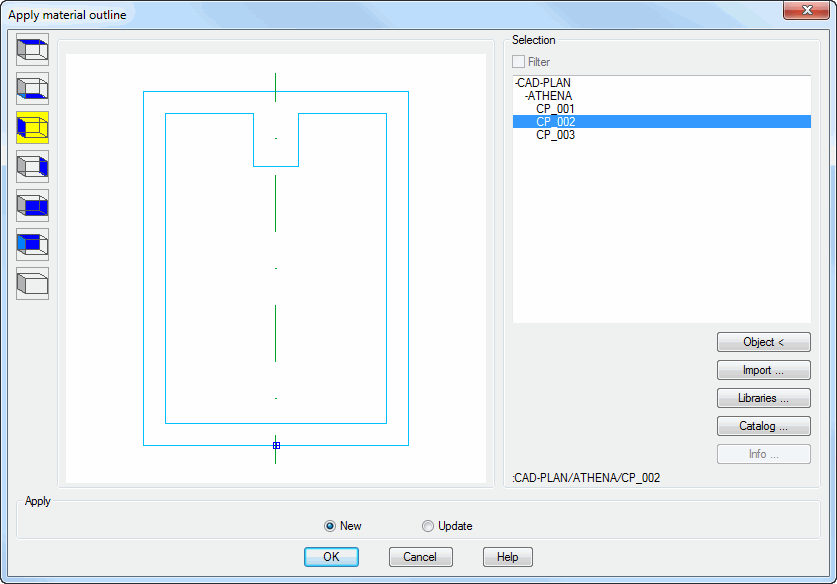
Inserts free semi-finished product outlines, which have been saved previously with the Semi-finished product manager, into the drawing. Already inserted free semi-finished products can also be updated with this command once the saved object has been modified.
When you start the command, the following appears:
New Inserts the selected free semi-finished product into the drawing when you terminate the dialog box with OK. You can use the view buttons to control whether the free semi-finished product is generated as a cross section, 2D projection or 3D bar. The input request depends on the type of insertion.
Update Updates the free semi-finished product to be selected when the dialog box is terminated with OK.
Free semi-finished products can only be updated if they have been inserted into the drawing with the command Apply material outline, because only these semi-finished products are linked to the saved library object.
Free semi-finished products, which have been generated with the Free semi-finished product command, are not referenced to saved objects and cannot therefore be updated.
End of program
When you terminate the dialog box with OK, the following appears:
Input request Option New with 2D side elevation from left or right
Specify insertion point or [?]:
Use the mouse or enter coordinates to specify the insertion point of the free semi-finished product.
With the option ? you call the help.
Specify rotation angle or [?] <0>:
Specify the rotation angle or press the Enter key to accept the default angle.
Input request Option New with 2D front elevation, 2D rear elevation, 2D plan, 2D bottom elevation or 3D solid
[Object Mode]
Select axis or [Points/Multiple/?]:
Select a line or a polyline segment to determine the length of the object.
With the option Points you can determine the axis by specifying two points.
With the option Multiple you can select several lines as axes.
With the option ? you call the help.
Bar orientation [Mirror/Rotate/?]:
The option Rotate is used to rotate the object in 90° steps.
The option Mirror mirrors the object about the bar axis.
This input request is repeated; when you press the Enter key, you can generate another object.
Press the Enter key a second time to terminate the command.
[Point Mode]
Specify the axis start point or [Object/Multiple/?]:
Use the mouse or enter coordinates to specify the axis start point.
[Point Mode]
Specify the axis end point or [Undo/Object/?]:
Use the mouse or enter co-ordinates to specify the axis end point.
Bar orientation [Mirror/Rotate/?]:
See above.
[Multiple Mode]
Select objects:
Select several lines to generate multiple objects simultaneously.
This input request is repeated; when you press the Enter key, the command is terminated.
Input request Option Update
Select objects
Select the free semi-finished products which are to be updated.
x object(s) modified
When you close the dialog box with Cancel, the command is terminated without any further actions.