Program for designing stairways. All stairway parameters are defined in one dialog box. You can insert fully dimensioned steps and the plan, 3D model, step diagrams and strings/cross beams into the current drawing.
The basis for the stairway calculation is DIN 18065 (Building stairways).
Dialog box ATHENA Stairway
db_ath_stair
Display section
On the left side the dialog box contains a preview of the stairway. The preview is primarily used for a visual check, but offers other functions too:
Additional functions are activated by clicking in the preview with the mouse wheel. You will find further information on this in the section Object preview.
To the left of the preview there are buttons with which you can adjust both the preview and also the insertion of the projection into the drawing. You will find further information on this in the section Object views.
Operating section
On the right side of the dialog box there is the operating section with the tabs:
The individual tabs in turn contain drop-down menus with the appropriate setting options.
A description of the tabs and drop-down menus is given further below in this section. The Administration section is the same for other objects. You will find a detailed description of the Administration section in the Chapter Management of objects.
Tab Defaults
This section contains the following drop-down menus:
Vertical height States the vertical height spanned by the stairway.
The vertical height does not necessarily correspond to the height of the stairway. To calculate the stairway height other parameters, e.g. the first and last steps, are taken into account.
Stairway length Specifies the length of the stairway.
Stairway width Specifies the width of the stairway.
With string stairways the width including the strings is specified.
First step Defines whether the first step of the stairway starts with a riser or a going.
Last step Defines whether the last step of the stairway starts with a riser or a tread.
Dialog box section Walking line
Distance Defines the distance of the walking line to the outside or inside of the stairway.
Radius Defines the radius of the walking line for 1/4 or 1/2 spiral stairways.
Inside The distance of the walking line specified from the inner side of the stairway.
Outside The distance of the walking line specified from the outer side of the stairway.
Include handrail Measures the distance of the walking line from the center of the handrail.
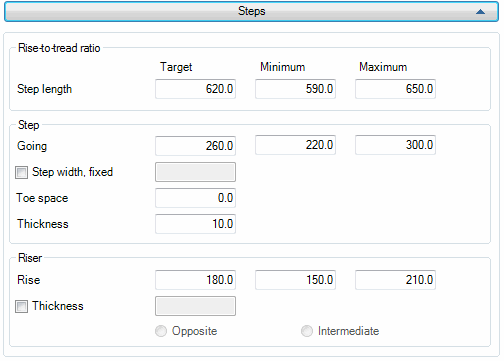
Drop-down menu Steps
db_ath_stair_vorgaben_stufen
Dialog box section Rise-to-going ratio
Step length Defines the specified as well as the smallest and greatest admissible step length.
Dialog box section Step
Going Defines the specified as well as the smallest and the largest admissible going.
Step width, fixed Activates a fixed width for the step. The width dimension of the step is specified in the input field.
Toe space Specifies the dimension for the toe space.
Thickness Specifies the thickness dimension for the step.
Dialog box section Riser
Rise Defines the specified as well as the smallest and greatest admissible rise.
Thickness Activates the riser. The thickness dimension of the riser is specified in the input field.
Opposite Causes the risers to be set from behind against the step.
Intermediate Causes the risers to be set between the steps.
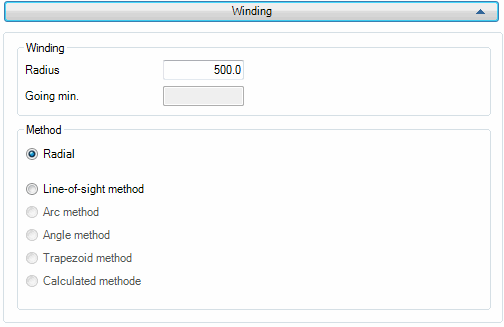
Drop-down menu Winding
db_ath_stair_vorgaben_verziehung
Dialog box section Winding
Radius Specifies the radius of the winding for the radial method. Specifies the radius of the stairwell for the line-of-sight method.
Going min. Specifies the minimum dimension for the going for the line-of-sight method.
Dialog box section Method
Radial Calculates the step winding of spiral stairs according to the radial method.
Line-of-sight method Calculates the step winding of spiral stairs according to the line-of-sight method.
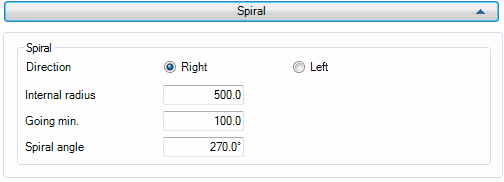
Drop-down menu Spiral
db_ath_stair_vorgaben_gewendelt
Dialog box section Spiral
Direction
Right Changes the default direction for spiral stairs to the right.
Left Changes the default direction for spiral stairs to the left.
Internal radius Specifies the default internal radius for spiral stairs.
Going min. Specifies the minimum dimension for the going of the steps.
Spiral angle Specifies the default angle for spiral stairs.
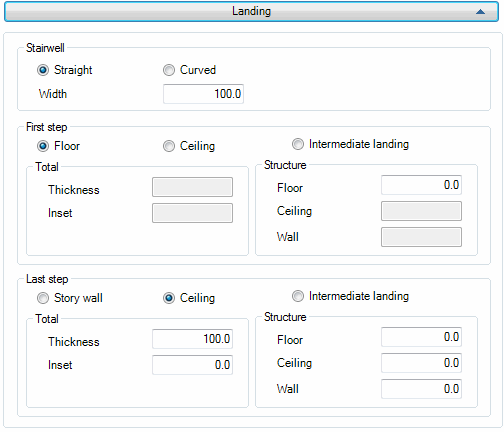
Drop-down menu Landing
db_ath_stair_vorgaben_podest
Dialog box section Stairwell
Straight Sets a straight stairwell as default. The width of the stairwell can be defined in the input field.
Curved Sets a curved stairwell as default. The radius of the stairwell can be defined in the input field.
Width/radius Defines the width or the radius of the stairwell.
Dialog box section First step
Floor Specifies that the first step of the stairway begins on the floor. The height of the floor structure can be defined in the appropriate input field.
Ceiling Specifies that the first step of the stairway begins on the ceiling. The ceiling dimensions can be can be defined in the appropriate input fields
Intermediate landing Specifies that the first step of the stairway begins on the landing.
Dialog box section Total
Thickness Defines the total thickness of the ceiling.
Inset Defines the inset of the ceiling under the first step of the stairs.
Dialog box section Structure
Floor Defines the height of the floor structure.
Ceiling Defines the thickness of the ceiling.
Wall Defines the wall thickness.
Dialog box section Last step
Analogous to the first step, here corresponding default settings for the last step are defined. You will find the description of this in the dialog box section First step.
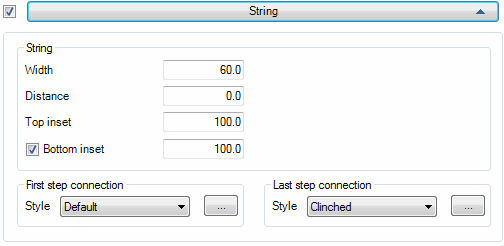
Drop-down menu String
db_ath_stair_vorgaben_wange
Dialog box section String
Width Defines the width of the string (material thickness).
Distance Defines the spacing between the step and the string.
Top inset Defines the distance of the front edge of a step to the upper edge of the string.
Bottom inset/Height Depending on the switch setting, here you set either the height of the string or the distance of the rear edge of the step to the lower edge of the string.
Dialog box section First step connection
Defines the type of connection of the string in the first step You can choose between: Standard, Horizontal and Vertical.
The offered possible selections depend on the selected floor connection of the first step in the Drop-down menu Landing.
[...] Depending on the type of connection selected, a sub-dialog box opens in which you can set additional connection parameters. You will find further information on this in the section First step string connection.
Dialog box section Last step connection
Defines the type of connection of the string in the last step. You can choose between: Standard, Clinched, Horizontal and Vertical.
The offered possible selections depend on the selected floor connection of the last step in the Drop-down menu Landing.
[...] Depending on the type of connection selected, a sub-dialog box opens in which you can set additional connection parameters. You will find further information on this in the section String connection, last step.
Drop-down menu Cross beam/joist
No yet available.
Drop-down menu Ladder string
No yet available.
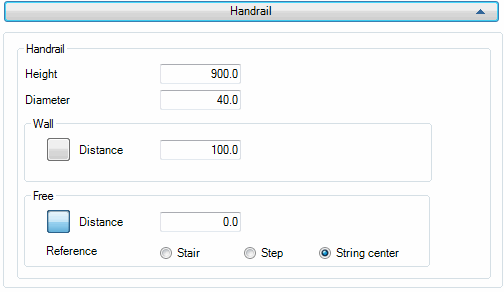
Drop-down menu Handrail
db_ath_stair_vorgaben_handlauf
Dialog box section Handrail
Height Defines the height of the handrail.
Diameter Defines the diameter of the handrail.
Dialog box section Wall
Distance Specifies the distance of the wall to the center of the handrail.
Dialog box section Free
Distance Specifies the distance from the center of the handrail alternatively to the stairway, step or wall. The distance which applies is defined with the following option fields:
Stairway Specifies the distance to the outer side of the stairway.
Step Specifies the distance to the outer side of the step.
String center Specifies the distance to the center stairway string.
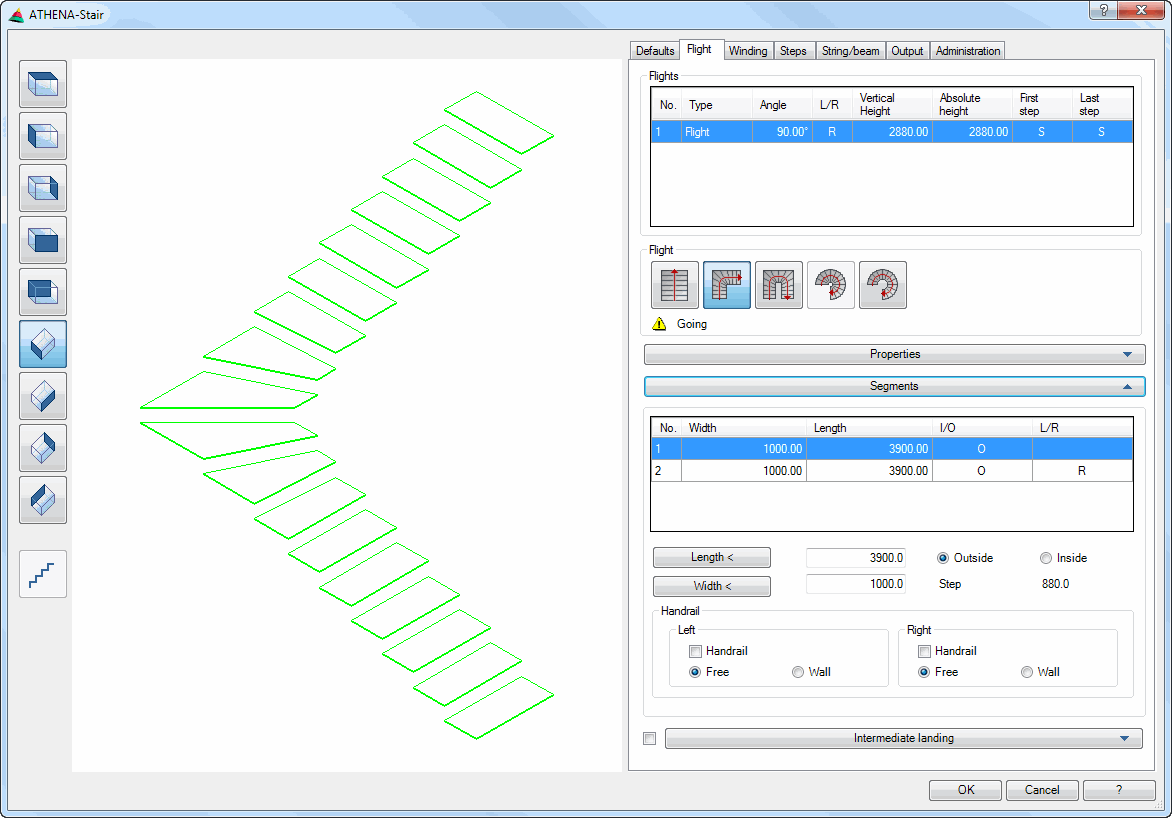
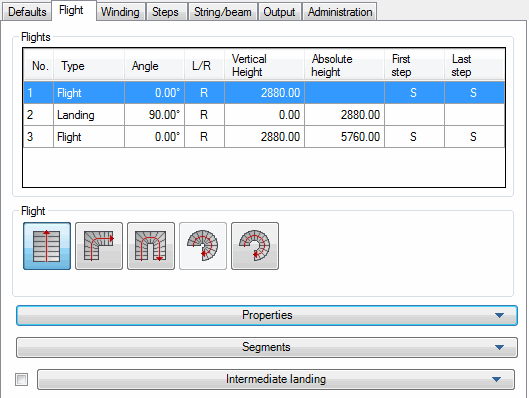
Tab Flight
The content of this tab is dynamic and changes in dependence of the active type of stairway, which is selected in the table of flights.
When a stairway flight is selected, buttons for changing the flight are displayed. Furthermore, the following drop-down menus are shown with further possible settings.
If you select a landing in the table, buttons for modifying the landing are displayed. Also, additional dialog box sections with further possible settings are displayed.
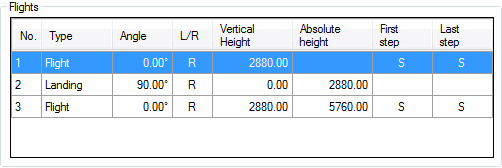
Dialog box section Flights
db_ath_stair_lauf_laeufe
Here, the available flights and landings with the properties are shown in tabular form. The properties of the relevant flight cannot be changed directly in the table. Changes can be made in the input fields further below. For this, select the flight to be changed in the table.
When you click a flight with the right mouse key, a context menu appears with the following options:
Add Appends a new flight at the end of the table.
Remove Deletes the selected flight from the table.
The flights and landings always alternate. Consecutive flights of steps or consecutive landings are not possible.
Stairway flight
When you select a flight, the dialog box appears as below:
db_ath_stair_lauf_treppenlauf
Dialog box section Flight
You can set the required flight by clicking the appropriate button.
Generates a straight flight of steps.
Generates a quarter spiral flight of steps.
The permissible angular range of this form of flight is 1° to 90°.
Generates a half spiral flight of steps.
The permissible angular range of this form of flight is 91° to 180°.
This option is however not yet released.
Creates a spiral stairway.
The permissible angular range of this form of flight is 1° to 360°.
If you repeated a click on one of the buttons, the direction (right/left) changes.
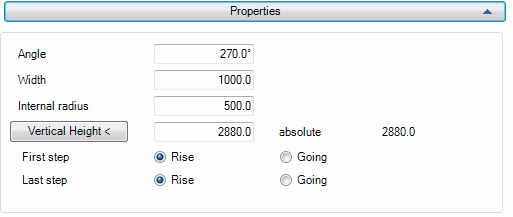
Drop-down menu Properties
db_ath_stair_lauf_treppenlauf_eigenschaften
Angle Specifies the angle for quarter spiral, half spiral and spiral stairways.
This input field is deactivated for straight flights.
Width Specifies the width for spiral stairs.
This input field is not displayed for the other types of stairway. Their width is defined in Drop-down menu Segments.
Internal radius Defines the internal radius of the spiral stairway.
This input field is not displayed for the other types of stairway.
Vertical height States the vertical height spanned by the stairway.
The difference in height normally corresponds to the story height (top edge of floor to top edge of floor on the next story).
With the Vertical height button < you can pick it up by clicking two points in the drawing. For this, the dialog box is temporarily closed and the input request appears:
Input request
Specify vertical height or [?] <2880>:
Specify the first point of the vertical height, e.g. a point on the finished floor of the story.
Press the Enter key to accept the default value in pointed brackets.
Specify second point:
Specify the first point of the vertical height, e.g. a perpendicular point on the finished floor of the next story.
First step Defines whether the first step of the stairway starts with a riser or a going.
Last step Defines whether the last step of the stairway finishes with a riser or a going.
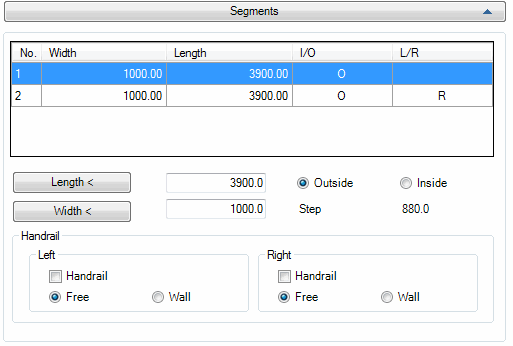
Drop-down menu Segments
db_ath_stair_lauf_treppenlauf_abschnitte
In the table the properties of the segments of the current flight are shown. You can change the properties of the selected flight in the further sections of the dialog box.
Length < Defines the length of the flight. If you click the button, you can access the length from the drawing. For this, the dialog box is temporarily closed and an input request appears.
Outside Specifies the length on the outer side of the stairway.
Inside Specifies the length on the inner side of the stairway.
Width < Defines the width of the flight. If you click the button, you can access the width from the drawing. For this, the dialog box is temporarily closed and an input request appears.
Dialog box section Handrail
Handrail, left/right Switches on the handrail on the relevant side for the current stairway section.
Free Uses the default free distance between the handrail and stairway.
Wall Uses the default wall spacing for the handrail.
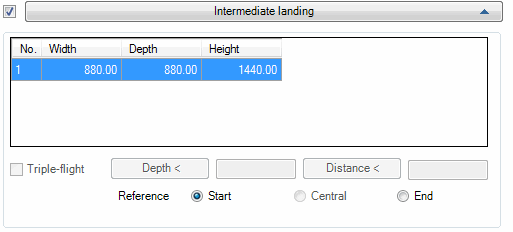
The table shows the properties of the landings. You can change the properties of the selected landings in the further sections of the dialog box.
Intermediate landings can be switched on for single or multi-flight stairways. You interrupt a stairway flight without changing the direction of the flight.
Triple-flight Generates two landings with half-spiral stairs so that a stairway with three flights is created.
Depth < Sets the depth dimension of the landing.
Distance < Sets the horizontal distance of the landing to the stairs.
Reference Defines the reference to which the distance dimension of the landing refers.
Start The distance is measured from the front edge of the first step of the stairway to the front edge of the landing.
Middle The distance is derived.
This option is only available for half-spiral stairways with landing.
End The distance is measured from the rear edge of the last step of the stairway to the rear edge of the landing.
Stairway landing
When you select a stairway landing, the dialog box appears as below:
db_ath_stair_lauf_treppenpodest
In contrast to the intermediate landing which interrupts a flight of steps, a stairway landing is a component which actually separates different flights of steps. Consequently, with the stairway landing the flight direction of the stairway can be changed.
Dialog box section Type
You can set the required flight by clicking the appropriate button.
Generates a straight landing without changing the flight direction.
Generates a landing with a change in the flight direction.
The permissible angular range of this form of landing is 1° to 90°.
Generates a landing with a change in the flight direction.
The permissible angular range of this form of landing is 91° to 180°.
Generates a landing in a spiral newel form.
The permissible angular range of this form of landing is 1° to 269°.
Generates a landing in a spiral form.
The permissible angular range of this form of landing is 1° to 360°.
If you repeat a click on one of the buttons, the direction (right/left) changes.
Generates a landing by choosing a drawn outline. For this, the dialog box is temporarily closed and the following appears:
Input request
Select the outline Landing or [?]:
Select the outline which you want to use as the landing.
The outline for the landing must be a closed polyline with at least two straight segments.
Select side for approaching flight or [?]:
Select a polyline segment of the outline for the approaching flight. Here it is sufficient to click in the vicinity of a segment.
Select the left side connection or [?]:
Select a point on the line just selected (polyline segment). At the selected point the left side of the tread of the approaching flight is connected. Press the Enter key to use the left end (start point of the rubber-band line) of the line.
Select side for leaving flight or [?]:
Select a polyline segment of the outline for the leaving flight. Here too, it is sufficient to click in the vicinity of a segment.
Select the left side connection or [?]:
Select a point on the line just selected (polyline segment). At the selected point the left side of the first step of the leaving flight is connected. Press the Enter key to use the right end (start point of the rubber-band line) of the line.
First step Defines whether the first step connects to a building structure, a ceiling or an intermediate landing.
Last step Defines whether the last step connects to a building structure, a ceiling or an intermediate landing.
Dialog box section Dimensions
Angle Defines the angle in the change of flight direction.
The permissible angles depend on the selected type of landing.
If you have imported a landing from the drawing, the angle cannot however be changed.
Width Specifies the landing width.
Depth Specifies the landing depth.
The width and depth of the landing depends, according to the type, on various parameters (e.g. width of the flight). In this case the dimensions are displayed, but cannot be changed.
Dialog box section Total
Thickness Defines the total thickness of the ceiling.
The stairwell can only be manually activated with quarter spiral stairways. With half spiral and spiral newel stairways it is automatically turned on for constructional reasons. With straight stairways and spiral stairways there is no stairwell.
Straight Activates a straight stairwell
Curved Activates a curved stairwell
Width/radius Defines the width or the radius of the stairwell according to the selected type (straight or curved).
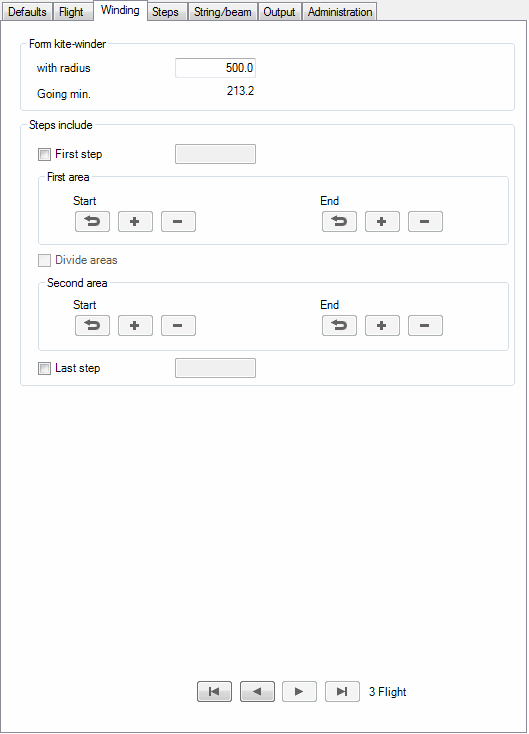
Tab Winding
db_ath_stair_verziehung
Here you can manipulate the winding in the stairs.
Dialog box section Form kite-winder
With radius Defines the radius for winding the steps.
First step Activates a diagonal first step. In the input field which is enabled on activating the tick box you can define the starting angle.
Dialog box section 1st Region
Start/End With the relevant buttons you can include additional steps or remove steps when winding steps at the start and end.
Restores the original state of the winding. This means that manually inserted steps are deleted and manually removed steps are added.
Includes a further step in the relevant area (start or end).
Removes a step from the relevant area (start or end).
Divide areas Divides the sections of the winding for half spiral stairways. In this way you can separately adapt the winding for any change in direction.
Last step Activates a diagonal last step. In the input field which is enabled on activating the tick box you can define the finishing angle.
Manual inclusion and removal of steps is not possible with all methods of winding. Currently, it only works with the line-of-sight method (see Winding).
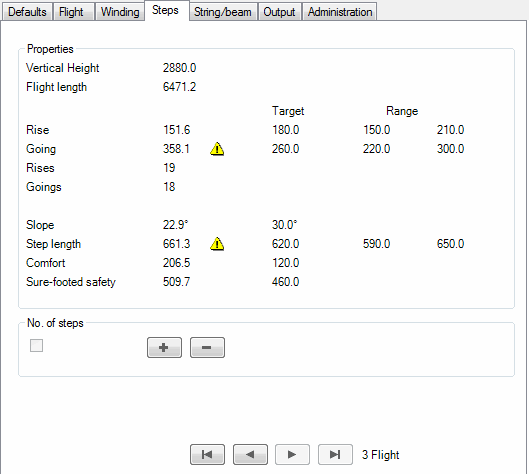
Here, apart from the calculated values of the current stairway the set default values as well as the minimum and maximum values are displayed for checking.
If the calculated values deviate from the default values, a yellow warning symbol is displayed. In this case you have to decide whether the deviation is acceptable or whether the corresponding values can be improved by the removal or addition of steps.
Dialog box section Number of steps
The tick box is automatically activated when you manipulate the number of steps. If the tick box is deactivated, the number of steps calculated for the flight by the program is used.
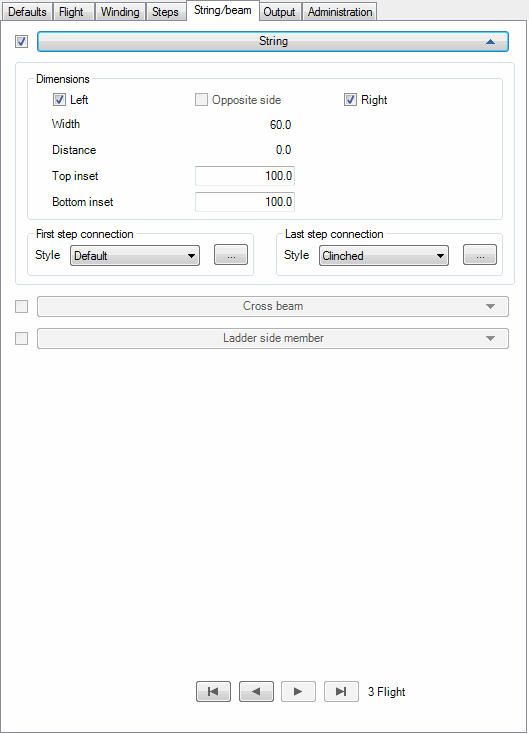
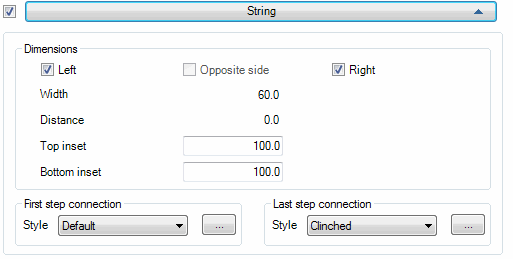
The tick box on the left next to the drop-down menu activates the string for the relevant flight.
Dialog box section Dimensions
Left Activates the string on the left side of the flight.
Opposite side Activates the string on the opposite side of the flight.
Right Activates the string on the right side of the flight.
Width Shows the string width which has been defined in the default values.
Distance Shows the distance of the string to the flight defined in the default values.
Top inset Defines the distance of the front edge of a step to the upper edge of the string (top inset).
Bottom inset/Height Depending on the default setting, here either the height of the string or the distance of the rear edge of the step to the lower edge of the string (bottom inset) is set.
Dialog box section First step connection
Defines the type of connection of the string in the first step You can choose between: Standard, Horizontal and Vertical.
The offered possible selections depend on the selected floor connection of the first step in the Drop-down menu Landing.
[...] Depending on the type of connection selected, a sub-dialog box opens in which you can set additional connection parameters. You will find further information on this in the section First step string connection.
Dialog box section Last step connection
Defines the type of connection of the string in the last step. You can choose between: Standard, Clinched, Horizontal and Vertical.
The offered possible selections depend on the selected floor connection of the last step in the Drop-down menu Landing.
[...] Depending on the type of connection selected, a sub-dialog box opens in which you can set additional connection parameters. You will find further information on this in the section String connection, last step.
Drop-down menu Cross beam/joist
Cross beams and joists are not currently supported.
Drop-down menu Ladder string
Ladder strings are not currently supported.
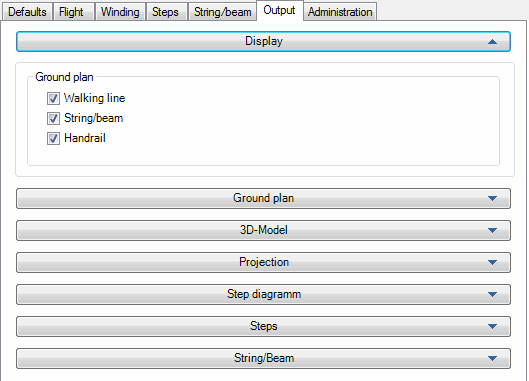
Tab Output
db_ath_stair_ausgabe
This section contains the following drop-down menus:
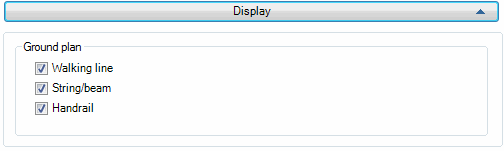
Walking line Switches off the preview of the walking line
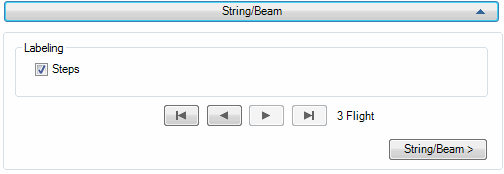
String/beam Switches off the preview of the string and cross beam.
Handrail Switches off the preview of the handrail
Drop-down menu Ground plan
db_ath_stair_ausgabe_grundriss
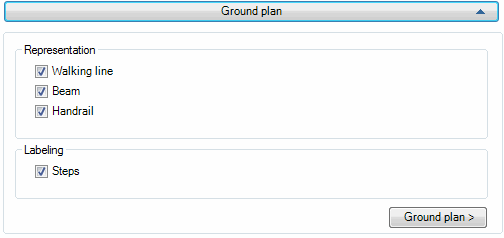
Dialog box section Representation
Walking line Displays the walking line when you insert a plan of the stairs.
Beam Displays the beam when you insert a plan of the stairs.
Handrail Displays the handrail when you insert a plan of the stairs.
Dialog box section Labeling
Steps Labels the steps of the inserted plan.
Ground plan > Inserts the plan with the above defined settings into the drawing. For this, the dialog box is temporarily closed and the following appears:
Input request
Specify insertion point or [Update/?]:
Specify the insertion point of the plan. You can update an existing plan with the Option Update.
With the option ? you call the help.
Specify rotation angle or [Update/?] <0>:
Specify the rotation angle of the plan or press the Enter key to accept the default angle (0°).
Option Update
Select objects:
Select the plan which you want to update.
Drop-down menu 3D model
db_ath_stair_ausgabe_3d-modell
3D model > Inserts a 3D model into the drawing. For this, the dialog box is temporarily closed and the following appears:
Input request
Specify insertion point or [Update/?]:
Specify the insertion point of the 3D model. You can update an existing 3D model with the Option Update.
With the option ? you call the help.
Specify rotation angle or [Update/?] <0>:
Specify the rotation angle of the 3D model or press the Enter key to accept the default angle (0°).
Option Update
Select objects:
Select the 3D model which you want to update.
Drop-down menu Projection
db_ath_stair_ausgabe_projektion
Projection > Inserts the current preview picture as a two-dimensional projection into the drawing. For this, the dialog box is temporarily closed and the following appears:
Input request
Specify insertion point or [Update/?]:
Specify the insertion point of the projection. You can update an existing projection with the Option Update.
With the option ? you call the help.
Specify rotation angle or [Update/?] <0>:
Specify the rotation angle of the projection or press the Enter key to accept the default angle (0°).
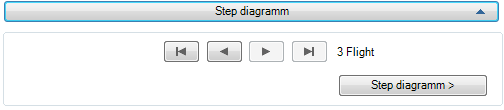
Step diagram > Inserts the step configuration of the current flight into the drawing. For this, the dialog box is temporarily closed and the following appears:
Input request
Specify insertion point:
Specify the insertion point of the step configuration. With the option ? you call the help.
Specify rotated angle<0>:
Specify the rotation angle of the step configuration or press the Enter key to accept the default angle (0°).
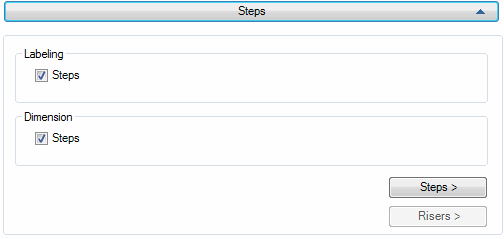
Drop-down menu Steps
db_ath_stair_ausgabe_stufen
Labeling Steps Labels the steps on insertion with a tag and the quantity.
Dimension Steps Dimensions the steps on insertion. Rectangular steps are not dimensioned!
Steps > Inserts the steps of the stairway into the drawing. For this, the dialog box is temporarily closed and the following appears:
Input request
Specify insertion point or [?]:
Specify the insertion point of the step. With the option ? you call the help.
This input request is repeated until all steps have been inserted into the drawing.
Risers > Inserts the risers of the stairway into the drawing. For this, the dialog box is temporarily closed and the following appears:
Input request
Specify insertion point or [?]:
Specify the insertion point of the riser. With the option ? you call the help.
This input request is repeated until all steps have been inserted into the drawing.