With this command you can produce in the drawing cross sections of walls which have been previously saved with the Wall manager.
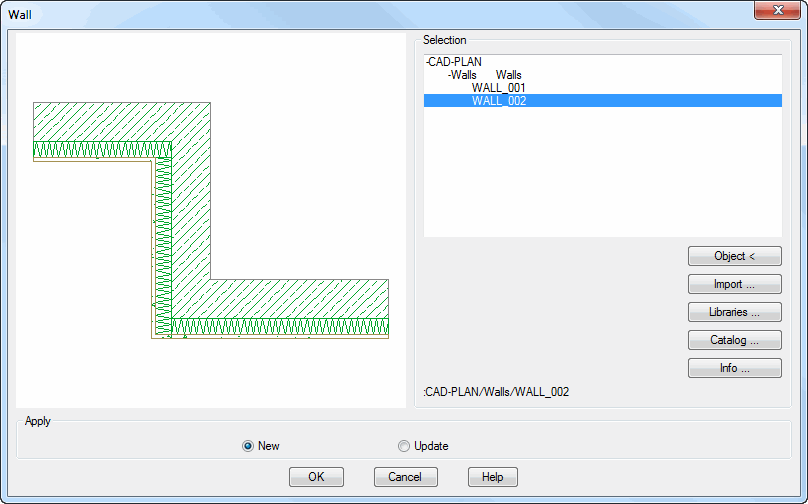
Dialog box Apply wall
db_ath_wall_use
A description of the dialog box sections Selection and the graphical preview can be found in the Chapter Object selection.
Dialog box section Apply
New Creates a new wall. For this, the Dialog box Wall parameters is opened, where you can define further settings before the wall is inserted.
Update Updates an existing wall cross section, the properties of which have been changed.
Walls can only be updated if they have been inserted into the drawing with the command Apply wall, because only these walls are linked to the saved library object.
Walls, which have been generated with the Wall command, are not referenced to saved objects and cannot therefore be updated.
Input request
Select objects:
Select the walls which you want to update and then press the Enter key.
x object(s) modified
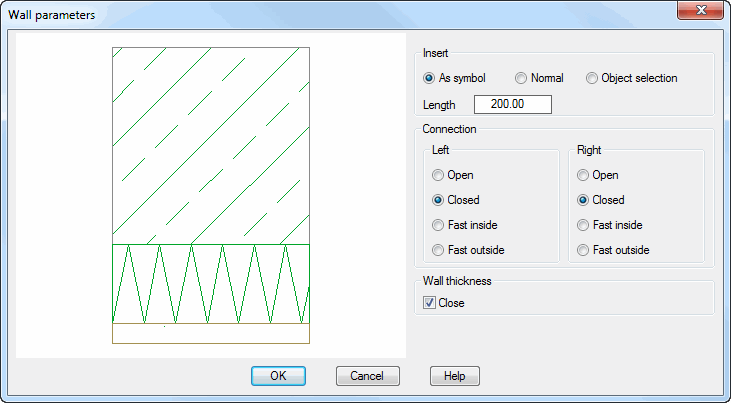
Dialog box Wall parameters
db_ath_wall_use_parameter
Dialog box section Insert
As symbol Creates the wall as a segment with fixed length. The dialog box is closed and an input request follows:
Length Defines the length of the wall section when you insert the wall as a symbol.
Normal Generates a wall as a series of lines. The dialog box is closed and an input request follows:
Object selection Generates a wall by selecting a line object. The dialog box is closed and an input request follows:
Dialog box section Left/Right
Determines the type of connection to the right or left side of the wall.
Open Opens the wall on the corresponding side, for example for an interrupted representation.
Closed Closes the wall on the corresponding side.
Abutment inside Shows a mounting on the inside of the wall with the entered thickness and width.
Abutment outside Shows a mounting on the outside of the wall with the entered thickness and width.
Dialog box section Wall thickness
Close Closes the lowermost layer of the wall structure.
When you terminate the dialog box with OK, an input request follows depending on the input option selected.
Wall as symbol
Input request
Specify insertion point:
Define the insertion point of the wall.
Specify rotated angle<0>:
Specify the rotation angle of the wall or press the Enter key to accept the default angle.
Generate wall with the Normal option
Input request
Specify starting point of wall or [?]:
Specify the starting point of the wall.
With the option ? you call the help.
Specify next point or [Arc point/Undo/Direction/Length/?]:
Specify the second point of the wall.
Use the option Undo to repeat the previous input request.
Specify side for wall thickness or [Central/Undo/?] <Central>:
Specify on which side of the polyline the wall structure is to be created.
With the option Central the wall structure is positioned on both sides of the polyline.
Specify next point or [Arc point/Undo/Direction/Angle/Length/?]:
Specify the next point of the wall.
With the Option Arc point you can specify an arc point. Further input requests follow.
With the Option Direction you can specify the direction for the next wall section. Further input requests follow.
With the Option Angle you can specify an angle. Further input requests follow.
With the Option Length you can specify the length for the wall section. Further input requests follow.
This input request is repeated. Press the Enter key to terminate the command.
Specify side for wall thickness or [Central/Same/Undo/?] <Same>:
Specify on which side of the polyline the wall structure is to be created.
Press the Enter key to draw the wall on the side previously specified.
Option Arc point
Specify arc point or [Line/Undo/?]:
Specify an arc point.
With the option Line you can draw straight wall sections.
Specify endpoint of the arc or [Undo/Line/Arc point/?]:
Enter the end point of the arc or select an option.
Option Direction
Specify direction or [Length/Angle/Point/Undo/?]:
Specify the direction of the wall section or select an option.
Specify limb length or [Direction/Angle/Point/Undo/?]:
Define the length of the wall section by pointing with the mouse or entering the length.
Option Angle
Specify angle or [Length/Direction/Point/Undo/?]:
Define the angle relative to the last wall section by pointing with the mouse or entering the angle or selecting an option.
Specify limb length or [Direction/Angle/Point/Undo/?]:
Define the length of the wall section by pointing with the mouse or entering the length or selecting an option.
Option Length
Specify limb length or [Direction/Angle/Point/Undo/?]:
Define the length of the wall section by pointing with the mouse or entering the length or selecting an option.
Specify angle or [Length/Direction/Point/Undo/?]:
Define the angle relative to the last wall section by pointing with the mouse or entering the angle or selecting an option.
Generate wall with the Object selection option
Input request
Select Polyline or [?]:
Select a polyline to create the wall.
With the option ? you call the help.
Specify side for wall thickness or [Central/?] <Central>:
Specify on which side of the polyline the wall structure is to be created.
With the option Central the wall structure is positioned on both sides of the polyline.
Delete polyline [Yes/No/?] <Yes>:
Select the option Yes to delete the polylines.
The polyline is retained with the option No.
All walls, which you insert with this command, are linked to the saved library object and can be updated.