Tab ATHENA > Group Drawing > Sheet metal processing
Menu:
ATHENA > Sheet metal > Placement plan profiled sheet
Toolbar:
ATH Sheet metal > Placement plan profiled sheet
Command input:
ath_fplate
Places profiled sheets in rectangular areas by specifying diagonal corner points.
The placement plan is shown schematically: The profiled sheets are marked with a straight, diagonal line, in the middle of which the quantity and the position number as well as the designation and the length of the profiled sheet can be seen. In the first third of the line there is a directional arrow indicating the clamping direction.
Since the profiled sheets in the placement plan are assigned to a job, a job must have been created in the drawing with the Project Manager. When you run the command, you must first select the job, then follows:
Input request
Clamping direction [Vertical/Horizontal/?] <Horizontal>:
Specify the clamping direction (alignment).
Choose the option Horizontal to place the profiles horizontally.
Choose the option Vertical to place the profiles vertically.
With the option ? you call the help.
Once you have chosen the clamping direction for your placement plan, the Dialog box Profiled sheet is displayed. Here, select the desired profiled sheet and click OK. Now you can generate the placement plan by specifying the diagonal corner points:
Specify the diagonal end point of the profile placement.
This input request is repeated until you terminate the command by pressing the ENTER key.
While the input request is active, the Palette Placement plan profiled sheet is displayed. Here, you can adapt some properties while you generate the placement plan.
General properties of the Palette will not be discussed here. For more information, refer to the AutoCAD documentation.
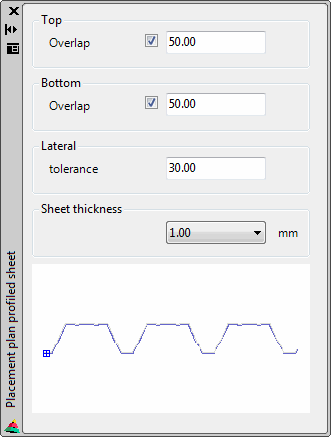
Palette Placement plan profiled sheet
db_ath_fplate
Dialog box section Top and Bottom (Right and Left)
Overlap Defines the overlap of the profiled sheets. When you switch off the tick box, no overlap is used. With overlap, the clamping direction is taken into account. With a vertical clamping direction the overlap at the top and bottom is specified. With a horizontal clamping direction this is right and left.
The texts in the dialog box change depending on the clamping direction:
• Clamping direction vertical: Top and Bottom.
• Clamping direction horizontal: Right and Left.
Dialog box section At the side
Tolerance Defines the limit from when a further profiled sheet is generated.
E.g. for a profiled sheet width of 1000 and tolerance 30:
• If the orthogonal distance between the selected points is 1031 to 2030, two profiled sheets are generated.
• If the distance is 2031 (to 3030), three profiled sheets are generated.
• From 3031 (to 4030) four profiled sheets are generated, etc.
Sheet thickness Here, you can modify the material thickness of the profiled sheets. In the list the available sheet thicknesses of the selected profiled sheet are displayed.
End of program
When you conclude the input request by pressing the ENTER key, the command is terminated.