ATH Drawing > Insulation ATHENA Drawing > Insulation
Command input:
ath_insul
With this command you create thermal insulation with various shapes and properties.
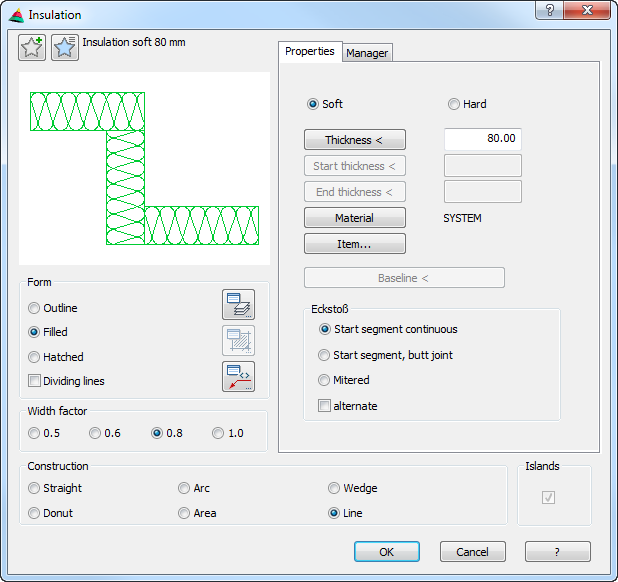
Dialog box Insulation
In the dialog box you will find on the left side the Display section with the dynamic preview. On the right side you can see the Operating section with the tabs Properties and Manager. The properties are object specific; the manager is the same for all objects.
db_ath_dmto
Display section
At the top left there are two buttons for favorites. You will find further information on this in the section Saving and using favorites.
The preview is primarily intended for visual checks and shows the part with the set properties.
Dialog box section Form
Outline Creates an insulation without infill.
Filled Creates a filled insulation. The infill depends on the options Soft and Hard.
Hatched Creates insulation with hatched infill. When you select a material, the material-dependent hatching is used.
Dividing lines Activates dividing lines between the insulation layers.
Here, you change the displayed width of the insulation from very narrow (0.5) to wide (1.0).
Operating section
Tab Properties
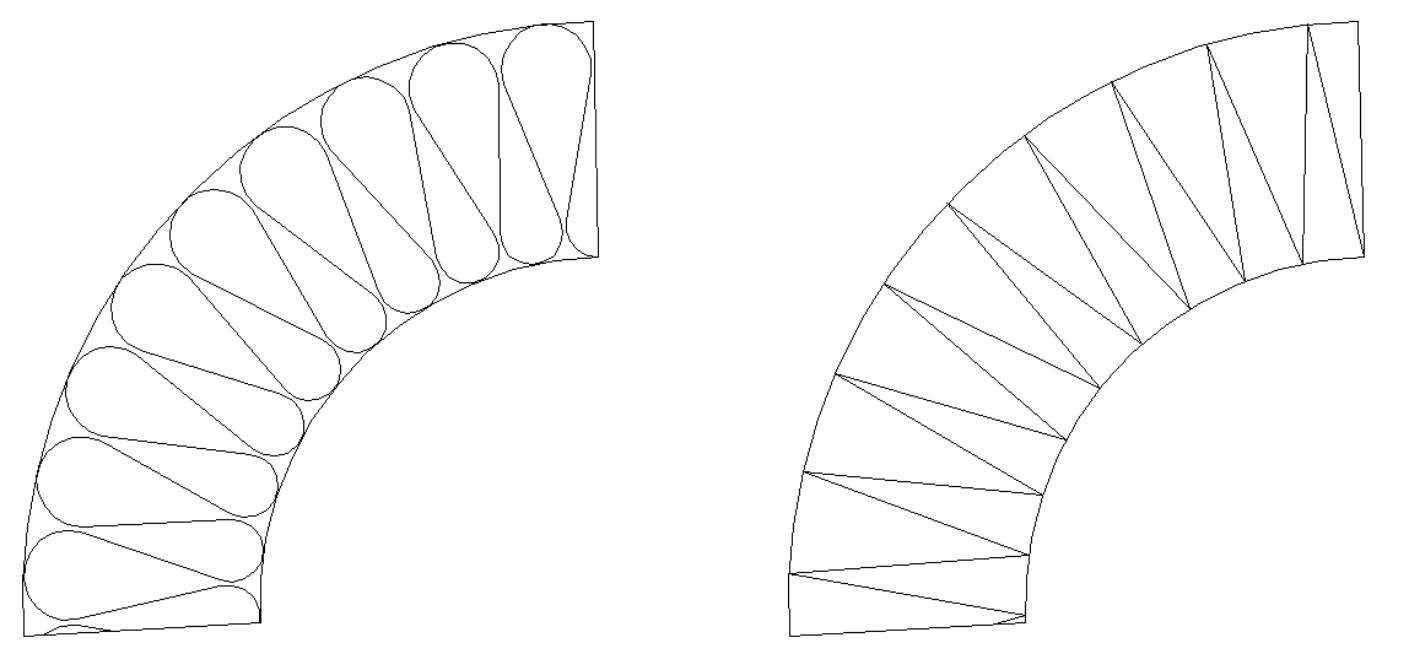
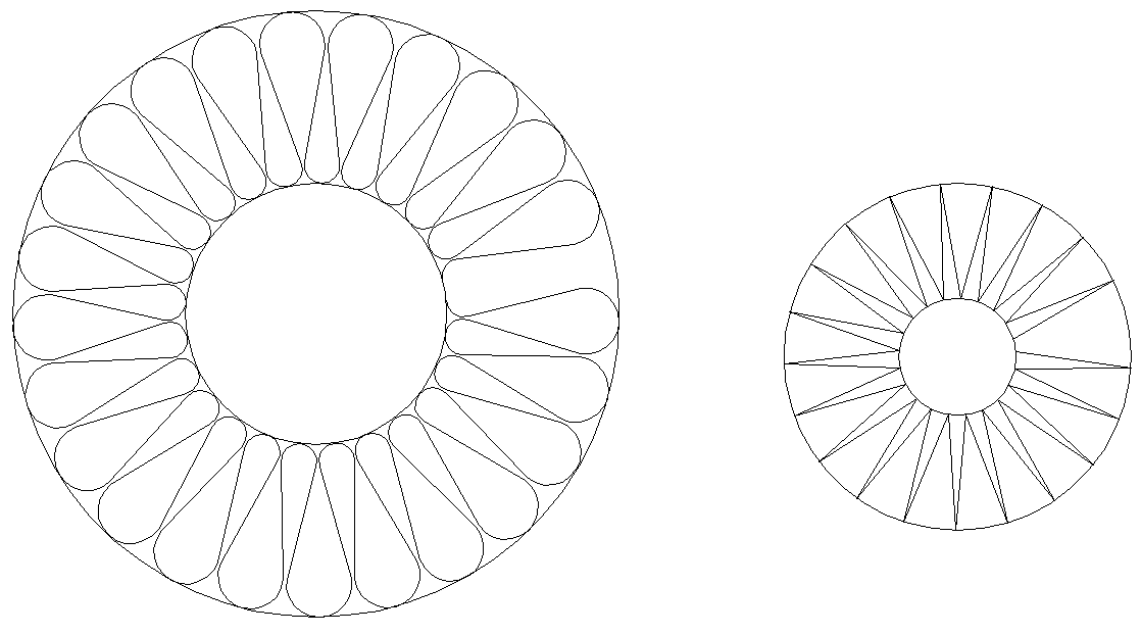
Soft Produces soft insulation (round shape).
Hard Creates hard insulation (polygonal shape).
Thickness Defines the thickness of the insulating layers. When you click the button Thickness <, you can measure it off in the drawing. The dialog box is temporarily closed and you can define the thickness by clicking two points.
Start thickness Defines the start thickness of the insulation. When you click the button Start thickness <, you can measure it off in the drawing. The dialog box is temporarily closed and you can define the start thickness by clicking two points.
End thickness Defines the end thickness of the insulation. When you click the button End thickness <, you can measure it off in the drawing. The dialog box is temporarily closed and you can define the end thickness by clicking two points.
Item Opens the Dialog box Item, where you can select an item number. You will find a detailed explanation on items in the Chapter Item.
Baseline You can change the alignment of flat-shaped thermal insulation with the button Baseline. The button is only active once you have called the dialog box for modifying an insulation.
Dialog box section Corner joint
These options are only displayed if you have selected the polyline design type.
End of segment, continuous Creates insulation whose segments pass through the vertices before the next section.
End of segment, butt joint Creates insulation whose segments in the vertices touch the next section.
Mitered Creates insulation segments with mitered joints.
Alternate Creates alternate continuous and joining segments.
This tick box works together with the options End of segment continuous or End of segment butt joint.
Dialog box section Construction
Straight Creates straight insulation.
Arc Creates arc-shaped insulation.
Wedge Creates wedge-shaped insulation.
Donut Creates donut-shaped insulation.
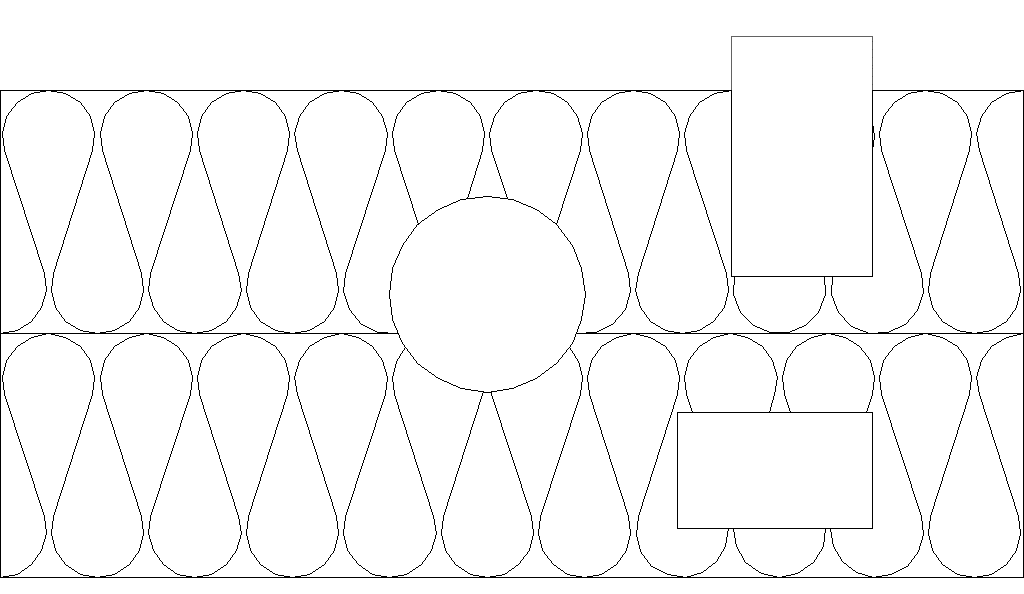
Area Fills a freely shaped area with insulating layers.
Line Creates insulation as a polyline.
Islands Switches the island detection on or off.
Tab Manager
You will find a detailed description of the functions of the manager in the Chapter Management of objects.
End of program
When you click OK, the dialog box is terminated and an input request follows dependent on the selected type of construction.
You can terminate the Dialog box Insulation directly after calling the command by pressing the Enter key to access the input request. In this way you have the possibility of very quickly creating several insulations with identical properties.
E.g.: You have just created an insulation with certain properties. Now press the Enter key twice (once to repeat the Insulation command and a second time to terminate the dialog box immediately) and draw a further insulation with the same properties.
Input request
Straight and wedge types of construction
Specify start point or [Settings/?]:
Specify the starting point of the insulation.
Use the option Settings to run the Dialog box Insulation and to change the insulation properties.
With the option ? you call the help.
Specify the end point or [Undo/?]:
Specify the end point of the insulation.
Use the option Undo to repeat the previous input request.
Specify the side on which the insulation is to be drawn [Undo/?]:
Define the side on which the insulation is to be drawn.
Select islands
Select objects:
Select the objects within the insulation to leave the insulation open at these points. This input request only appears when the Islands option has been activated.
ath_dmto_gerade
Thermal insulation option Straight (with islands)
Input request
Arc type of construction
Specify start point or [Settings/?]:
Specify the starting point of the insulation.
Use the option Settings to run the Dialog box Insulation and to change the insulation properties.
With the option ? you call the help.
Specify arc point or [Undo/?]:
Specify an arc point.
Use the option Undo to repeat the previous input request.
Specify the end point or [Undo/?]:
Specify the end point of the insulation.
Specify the side on which the insulation is to be drawn [Undo/?]:
Define the side on which the insulation is to be drawn.
Select islands
Select objects:
Select the objects within the insulation to leave the insulation open at these points. This input request only appears when the Islands option has been activated.
ath_dmto_bogen
Thermal insulation option Arc
Input request
Donut type of construction
Specify center point or [Settings/?]:
Specify the center point of the insulation.
Use the option Settings to run the Dialog box Insulation and to change the insulation properties.
With the option ? you call the help.
Specify internal radius or [Undo/?]:
Specify the inner radius of the insulation.
Use the option Undo to repeat the previous input request.
Select islands
Select objects:
Select the objects within the insulation to leave the insulation open at these points. This input request only appears when the Islands option has been activated.
ath_dmto_rund
Thermal insulation option Donut
Input request
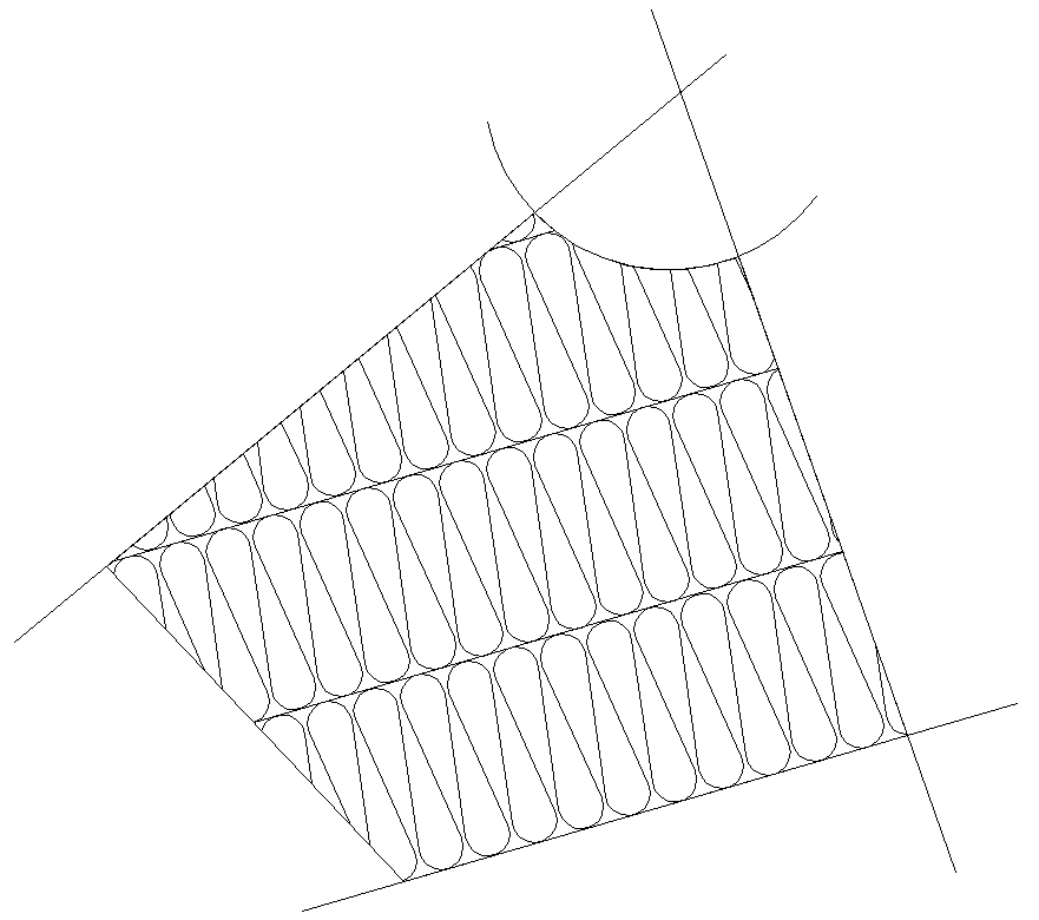
Area type of construction
Select a point in the area or [Settings/Object selection/?]: <Object selection>:
Enter a point within the area to be insulated.
Use the option Settings to run the Dialog box Insulation and to change the insulation properties.
Click in the vicinity of a line to align the insulation to it.
Use the option Undo to repeat the previous input request.
Select islands
Select objects:
Select the objects within the insulation to leave the insulation open at these points. This input request only appears when the Islands option has been activated.
ath_dmto_flaeche
Thermal insulation option Area
Input request
Polyline design type
Specify starting point of the insulation or [Object selection/?]:
Specify the starting point of the insulation.
With the option ? you call the help.
With the option Object selection you create an insulation by Select a polyline object.
Specify next point or [Arc point/Undo/Direction/Length/?]:
Specify the second point of the insulation.
Use the option Undo to repeat the previous input request.
Specify side for wall thickness or [Central/Undo/?] <Central>:
Specify on which side the insulation is to be drawn.
The insulation is produced centrally with the option Central.
Specify next point or [Arc point/Undo/Direction/Angle/Length/?]:
Specify the next point of the insulation.
With the Option Arc point you can specify an arc point. Further input requests follow.
With the Option Direction you can specify the direction for the next segment. Further input requests follow.
With the Option Angle you can specify an angle. Further input requests follow.
With the Option Length you can specify the length for the next segment. Further input requests follow.
This input request is repeated. Press the Enter key to terminate the command.
Specify side for wall thickness or [Central/Same/Undo/?] <Same>:
Specify on which side the insulation is to be drawn.
Press the Enter key to draw the insulation on the side previously specified.
Option Arc point
Specify arc point or [Line/Undo/?]:
Specify an arc point.
With the option Line you can draw straight segments.
Specify endpoint of the arc or [Undo/Line/Arc point/?]:
Enter the end point of the arc or select an option.
Option Direction
Specify direction or [Length/Angle/Point/Undo/?]:
Specify the direction of the next segment or select an option.
Specify limb length or [Direction/Angle/Point/Undo/?]:
Define the length of the next segment by pointing with the mouse or entering the length.
Option Angle
Specify angle or [Length/Direction/Point/Undo/?]:
Define the angle relative to the last segment by pointing with the mouse or entering the angle or selecting an option.
Specify limb length or [Direction/Angle/Point/Undo/?]:
Define the length of the segment by pointing with the mouse or entering the length or selecting an option.
Option Length
Specify limb length or [Direction/Angle/Point/Undo/?]:
Define the length of the segment by pointing with the mouse or entering the length or selecting an option.
Specify angle or [Length/Direction/Point/Undo/?]:
Define the angle relative to the last segment by pointing with the mouse or entering the angle or selecting an option.
Option Object selection
Select Polyline or [?]:
Select the polyline object which is to be converted to an insulation.
With the option ? you call the help.
Specify side for wall thickness or [Central/?] <Central>:
Specify on which side the insulation is to be drawn.
The insulation is produced centrally with the option Central.
Delete polyline [Yes/No/?] <Yes>:
With the option Yes you delete the existing polyline.
The polyline is retained with the option No.
ath_dmto_poly
Thermal insulation option Line
Note
• You can fit insulation to various shapes by stretching or with grips.
• You can change insulation properties with the command Modify object or by a double click.
• You can automatically label the insulation with the command Parts labeling.