With this routine you can insert infills (glazing, panels...) into the drawing as a 2D view. The infills are provided with a position number and dimensions and can optionally be completely dimensioned.
You can also qualify infills, i.e. select a qualified Infill and assign it directly to a job. Infills of this nature possess the same properties as 3D infills, they can be analyzed with Infill list and Infill diagram and are taken into account on generating sections.
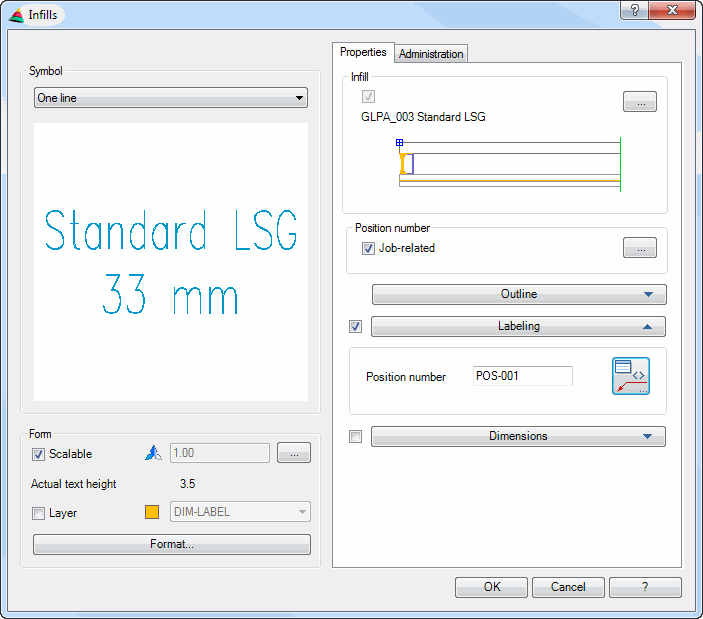
Dialog box Infills
In the dialog box you will find on the left side the display section with the preview. On the right side you will see the operating section. You can activate the individual function areas with register buttons.
Dialog box Infills
db_ath_bgla
Display section
Dialog box section Symbol
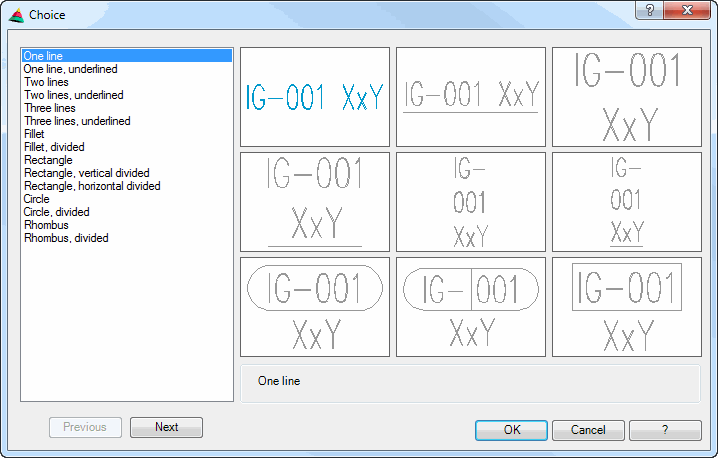
Above the preview there is a selection menu where you can choose between various position symbols. You can either select a symbol directly from the list or open the Dialog box Choice by clicking the symbol preview and selecting a symbol there.
Dialog box section Display
Scalable Activates the scalability for labeling. You will find further information on this in the section Scalability (label objects).
Actual text height Specifies the actual text height. This is calculated from the current text height and the scale factor.
Layer Displays the default layer of the labeling. When you activate the tick box, the pick box is activated in that you can change the default layer.
Format ... Opens the dialog box, where you can adapt the symbol settings. You will find further information in the ChapterFormat settings for labels.
Operating section
Register button Properties
Dialog box section Infill
If you activate the tick box, you can qualify the infill in that you use a saved infill.
[...] Click the button to open the Dialog box For object selection. Here, the profiled panels defined in the drawing are displayed Select a profiled panel and close the dialog box with OK. The designation of the selected panel is displayed in the dialog box.
Dialog box section Position number
Job-related Directly assigns the infill to a job. If you tick the box, the Dialog box Project Manager is started. There, you can select a job.
[...] Click the button to open the Dialog box Project Manager. There, you can change the job for the infills. You will find further information in the section Project Manager.
You can only assign infill elements to a job when they have been qualified, i.e. when you have selected a saved infill.
Drop-down menu Outline
Weather side Generates infills as an exterior view.
Room side Generates infills as an interior view.
Inset Defines the inset of the infill. You can also indicate the inset with the mouse. To do this, click the Inset < button with the mouse.
Variable inset Switches in the variable inset. You can now assign different insets to all edges of the infill.
Layer Here, you decide on which layer the outline is inserted.
Dialog box section Labeling
Activates the infill label in the form of a position symbol.
Also label original Additionally creates a label at the origin of the infill.
Dialog box section Text
Turns labels on or off.
Labeling Defines the name of the Infill as the fixed part of the infill label.
Increment Activates incrementing the variable extension of the infill label.
Start Specifies the variable extension of the infill label. You can enter figures and also letters. Special characters are not permissible.
Dimensions Specifies the dimensions of the infill label.
Dialog box section Dimensions
Switches dimensions on or off.
Settings Opens the Dialog box Dimension options. In this dialog box you can define, using tick boxes, in which manner the infills are to be dimensioned. You will find a detailed description of the Dimension options dialog box in the chapter Dimensioning options.
Register button Manager
You will find a detailed description of the functions of the manager in the Chapter Management of objects.
Dialog box Choice
db_ath_bgla_symbol
End of program
If you terminate the dialog box Infills with OK, the following input request appears:
The following input requests for the Inset only appear when the Variable inset tick box in the Infill dialog box is set.
Specify inset or [followingSame/?] <14>:
Specify the inset for the first side of the infill. With Enter you accept the default inset.
With the option followingSame the default inset is accepted for all the following sides.
Specify inset or [Undo/followingSame/?] <14>:
Specify the inset for the next side of the infill. With Enter you accept the default inset.
You can change the inset of the previous side with Undo.
This input request is repeated for all sides of the infill. After the last side follows:
Specify insertion point <Ok>:
Use the mouse or enter co-ordinates to specify the insertion point for the infill.
Specify point in the area or [Corner points/?]:
This query is repeated until the command is terminated with Enter or a right click.
Option Corner points
Specify corner point or [Area/?]:
Specify the first corner point of the outline with the mouse.
You can indicate a point in the area of the outline with the Option Area.
Specify corner point or [Area/Undo/?]:
Specify the next corner point of the outline with the mouse.
With the option Undo you can correct the last corner point.
Specify corner point or [Area/Undo/?]:
Specify the next corner point of the outline with the mouse. Once you have set the last corner point, you obtain the next input request by entering Enter or by giving a right click.
Specify insertion point <Ok>:
Use the mouse or enter co-ordinates to specify the insertion point for the infill.
Specify point in the area or [Corner points/?]:
This input request is repeated until the command is terminated with Enter or a right click.
ath_bgla
Glass dimensioning
Note
• The infill dimensioning generally occurs without decimal places.
• The current dimension settings (Layer ...) are used for dimensioning.