Tab ATHENA > Group Standard parts > Semi-Finished Product
Menu:
ATHENA > Drawing > Semi-Finished Product
Toolbar:
ATH Drawing > Semi-Finished Product ATHENA Drawing > Semi-Finished Product
Command input:
ath_hlbz
You use this routine to insert a semi-finished product into the current drawing. You can choose from twelve different shapes with any dimensions. Semi-finished products can be inserted and used in various 2D views or as a 3D object.
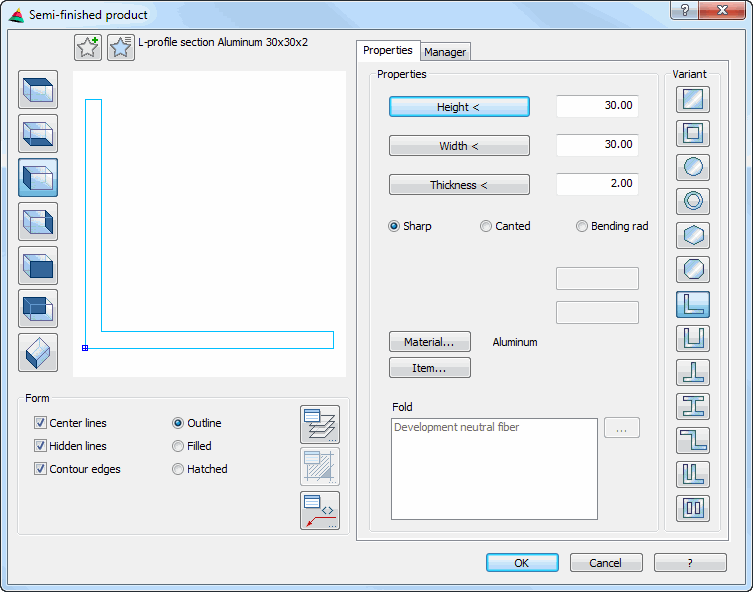
Dialog box Semi-finished product
In the dialog box you will find on the left side the Display section with the dynamic preview. On the right side you can see the Operating section with several tabs for the various functional areas. The Properties tab is object-specific. The Administration tab is similar for most dialog boxes.
db_ath_hlbz
Display section
At the top left there are two buttons for favorites. You will find further information on this in the section Saving and using favorites.
The preview displays the current semi-finished product. The preview is primarily used for a visual check, but offers other functions too:
Additional functions are activated by clicking in the preview with the mouse wheel. You will find further information on this in the section Object preview.
To the left of the preview there are buttons with which you can adjust both the preview and also the insertion into the drawing. You will find further information on this in the section Object views.
Note for insertion into the various views:
• When you insert a semi-finished product as side elevation from the left or right, only the base point and the rotation angle are interrogated. For further information siehe "Input request for semi-finished product sections".
• If you insert a semi-finished product as 2D plan view, 2D bottom view, 2D front elevation or 2D rear elevation, the profile length is interrogated on insertion. For further information siehe "Input request for semi-finished product projections".
• The solid is a "known" bar assembly, the name of which consists of the TMP and an incremented number. You will find further information on bar assemblies in the sections Bar assembly manager and Apply bar assembly.
Dialog box section Display
Center lines Switches center lines on or off.
Hidden lines Switches the hidden lines on or off.
Contour edge Switches the contour edges for semi-finished products on or off. This option is only available for semi-finished products with roundings.
Outline Creates a semi-finished product without infill.
Filled Creates a filled semi-finished product.
Hatched Creates a semi-finished product with hatched infill. When you select a material, the material-dependent hatching is used.
Labeling Opens the Dialog box Label. You will find further information on this in the Chapter Labeling.
Operating section
Tab Properties
Height Defines the height of the semi-finished product. With this button the dialog box Semi-finished product is temporarily closed and you can define the height by choosing two points.
Width Defines the width of the semi-finished product. With this button the dialog box Semi-finished product is temporarily closed and you can define the width by choosing two points.
Thickness Defines the thickness of the semi-finished product. With this button the dialog box Semi-finished product is temporarily closed and you can define the thickness by choosing two points.
Sharp Creates a sharp-edged semi-finished product (as extruded profile without radii).
Bent Creates a canted semi-finished product (folded sheet-metal part). With this option you can define a bending radius. This option is not available for all variants.
Rounded Creates a rounded semi-finished product (similar to rolled steel section). With this option you can define an inner and outer radius. This option is not available for all variants.
Bending radius Defines the bending radius. The input field is only available if you have activated the option Edged.
Internal radius Defines the inner radius. The input field is only available if you have activated the option Edged.
Outer radius Defines the outer radius. The input field is only available if you have activated the option Edged.
Fold Shows the folding tables which have been assigned to the material. Here you can select a table with bending allowances, so that the correct development for the folded semi-finished product can be calculated.
Item Opens the Dialog box Item, where you can select an item number. You will find a detailed explanation on items in the Chapter Item.
Dialog box section Variant
Here you define the type of semi-finished product. You can choose between the following profile variants:
• Square profile section
• Square tube
• Round profile section
• Round tube
• Hexagonal section
• Octagonal profile
• L profile
• U profile
• T profile
• I profile
• Z profile
• F profile
• Rectangular tube with web
Tab Manager
You will find a detailed description of the functions of the manager in the Chapter Management of objects.
End of program
Cancel Terminates the dialog box without inserting a semi-finished product.
OK Terminates the dialog box, the semi-finished product is attached to the cross-hairs and the following input request appears for insertion:
Input requestfor semi-finished product sections
Specify insertion point:
Use the mouse or enter coordinates to specify the insertion point of the part.
You can change between different insertion points by repeatedly pressing the Shift+Ctrl keys.
The grips of the relevant profile cross section can be used as insertion points. The insertion point activated by Shift+Ctrl only applies for the duration of the insertion.
Specify rotated angle<0>:
Use the mouse or enter an angle to specify the rotation angle. Press the Enter key to accept the default angle.
Select Option Points to specify the start and end points of the axis.
With the option ? you call the help.
Option Points
[Point Mode]
Specify the axis start point or [Object/?]:
Use the mouse or enter co-ordinates to specify the axis start point.
Choose the option Objects when you want to select an axis.
Specify the axis end point or [Undo/Object/?]:
Use the mouse or enter co-ordinates to specify the axis end point.
You select the option Undo to start the point entry anew.
Bar orientation [Mirror/?]:
The option Mirror mirrors the bar about its own axis.
Input requestfor semi-finished products as 3D solids
[Object Mode]
Select axis or [Points/?]:
Choose a system axis with the mouse.
Select Option Points to specify the start and end points of the axis.
With the option ? you call the help.
Option Points
[Point Mode]
Specify the axis start point or [Object/?]:
Use the mouse or enter co-ordinates to specify the axis start point.
Choose the option Objects when you want to select an axis.
Specify the axis end point or [Undo/Object/?]:
Use the mouse or enter co-ordinates to specify the axis end point.
You select the option Undo to start the point entry anew.
Choose the option Objects when you want to select an axis.
Bar orientation [Mirror/ Rotate/ surfaceAxis/ surfaceMiddle/ rotationAngle/ Point/?]:
The options for changing the bar orientation are described in the section Apply bar assembly.
ath_hlbz_t
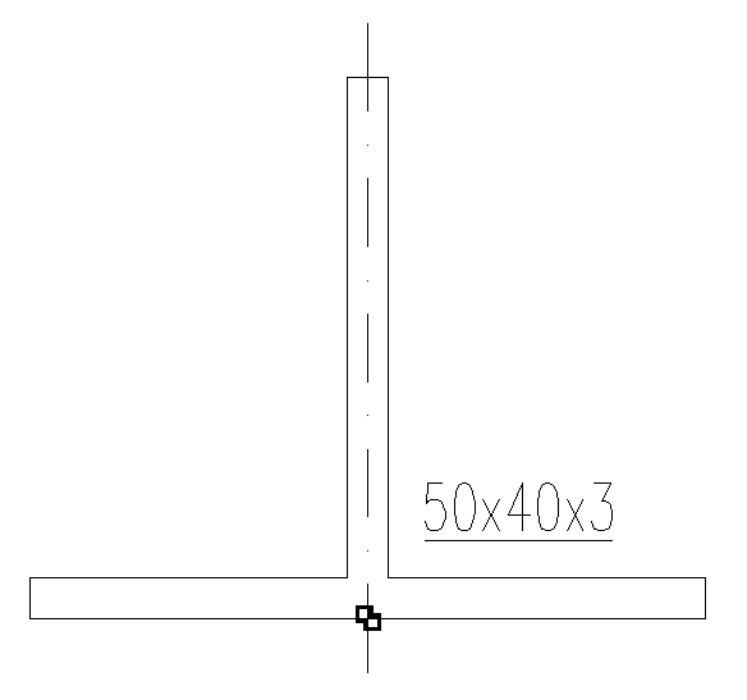
Semi-finished product (T-profile variant)
Note
• The generated semi-finished products can be retrospectively labeled with the command Parts labeling.
• You can change the properties of the semi-finished product with the command Modify object or by a double click.
• With the command Object to solid body you can convert the semi-finished products to solids.
• With the command Projection objects you can generate 2D projections of semi-finished products. When you modify a semi-finished product, all projections are similarly modified.
• Similar to 3D bars, 2D projections of semi-finished products can also be trimmed with the command Cutting.
• Similar to 3D bars, 2D projections of semi-finished products can also be sliced with the command Slice profile.