Tab ATHENA Model > Group Data > Bar assembly manager
Menu:
Modeling > Manage > Bar assembly manager
Toolbar:
ATH Manager > Bar assembly manager
Command input:
ath_bar_edit
This function serves in creating and editing qualified bar assemblies, which can be used as a bar in space (3D) or as a section in the drawing.
Bar assemblies can consist of one or more component parts and be provided with additional properties. These are in turn dependent on the type of bar assembly. The following types are possible:
1. Bar assemblies without further intelligence, i.e. those which only contain outline information.
2. Bar assemblies which are formed from references. References are pointers to other bar assemblies (similar to external references in drawings). The following variants and combinations can be defined from references.
– Simple variants. Application example: Mullions with or without mullion reinforcement.
– Glazing, i.e. assemblies whose components are modified or displaced depending on the glass thickness. Application example: Transoms in which variously thick panes can be fitted.
3. Bar assemblies which include stretchable outlines. Application example: Wooden mullions (stretchable) with aluminum attachments.
4. Profiles with stiffening (zig-zag or traverse).
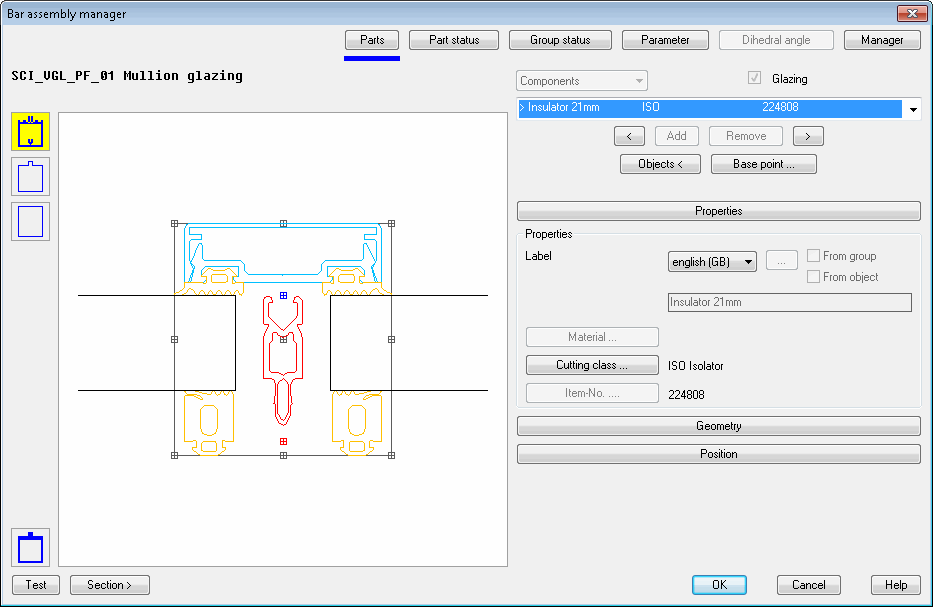
Dialog box Bar assembly manager
db_ath_bar_edit
Display section
In the upper section the name of the bar assembly is displayed if available.
The preview of the current bar assembly is dynamic. The active component is shown in red as standard. Inactive parts are displayed in their object color (for example, the color of the assigned material). Furthermore, a rectangle is displayed which encloses all components in the bar assembly.
The preview can be displayed in various ways:
Full display Shows the complete components in the preview.
Cutting outline Shows the cutting outlines of the components in the preview. If no cutting outline has been defined, the outer outline is displayed.
Simplified outline Shows the simplified outlines of the components in the preview.
The simplified outline displays components of up to 16 sides. With parts with more than 16 sides or arch-shaped segments the enclosing rectangle is shown.
Section > Inserts the current bar assembly as a section into the current drawing. For this, the dialog box is temporarily closed and the input request follows:
Input request
Specify insertion point:
Define the insertion point of the section.
Specify rotated angle<0>:
Define the rotation angle of the section. You can accept the default angle with Enter or a right click.
The operating section of the Bar assembly manager contains the following sections:
• Register button Parts: In this section you define and change the outline properties of the components. For example you can specify how the part is to be aligned within the bar assembly.
• Register button Part status: Here you can influence the additional information of component properties. You can for example define whether the component is listed in the parts list or not.
• Register button Group status: Here you define information and properties of the complete bar assembly. You can for example save structural analysis values or a variable dihedral angle.
• Register button Parameter: This section is available when the bar assembly contains references and varies in dependence of the assembly properties. For bar assemblies with variable lengths stretch parameters, for example, are displayed.
• Register button Dihedral angle: This section is active when variable dihedral angles have been defined for the bar assembly. Then for example, you can define how the components are to behave when the angle is changed.
• Manager In the Manager section the functions here include the saving and loading of bar assemblies. You will find a detailed description of the functions of the manager in the Chapter Management of objects.
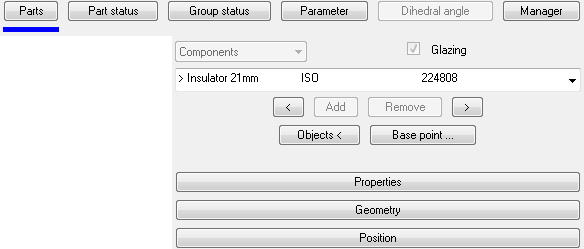
Register button Parts
The parts section consists of the component section and the drop-down menus:
Component list Shows all components in the current bar assembly and their properties. Here, you can select a component to modify its properties. The selected component is shown red in the preview. Referenced components are identified with an arrow (>). If you have defined stiffening, you can select its constituent parts (components, strut or bottom boom) in the left list.
< Activates the previous component in the list. The active component is shown red in the preview.
Add Adds a new component to the list. The new component initially has no outline. This means that you must assign an outline and define the other component properties.
Remove Removes the active component from the list.
> Activates the next component in the list. The active component is shown red in the preview.
Objects Adds objects from the drawing as components to the assembly. Objects that can be selected are components which have been inserted into the drawing as sections and ATHENA objects (for example semi-finished products). When you click the button, the dialog box is temporarily closed and the input request appears:
Input request
Select objects:
Select the objects which you want add as components for the assembly. Terminate the object selection by pressing the Enter key.
Specify the base point for the assembly or [?]:
Use the mouse or enter coordinates to specify the base point of the assembly.
If the current assembly already contains components, the selected components can either be supplemented or replace the current component. For this, a query is issued which you must confirm appropriately.
Base point ... Opens the Dialog box Base Point, where you can modify the base point of the assembly. You will find further information in the section Base point.
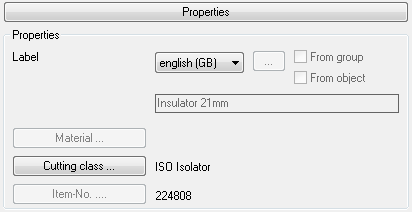
Drop-down menu Properties
db_ath_bar_edit_eigenschaften
Here you define the properties of the current component.
If components are used by referencing in a complex bar assembly, then only the cutting and the position can be modified in the assembly definition. You must modify the other properties on the original component.
Labeling Defines the designation of the component. You can save the component designation in various languages. To do this, choose the required language from the list.
[...] Opens the Dialog box Label, where you can conveniently edit the designations for various languages. You will find further information in the Chapter Label.
From group Adopts the designation and the item number of the assembly for the component.
This option is only available when the assembly consists of a single component. With several components, you must specify these details separately for each component, the button is grayed out.
Important: If you add a second component to a beam assembly, the switch is disabled (grayed out). If you subsequently change the component to a filling position or vitrification axis, the switch is available again, but must be switched on again, if necessary.
From object Adopts the designation of the object for the component. This option is only available for ATHENA objects.
Cutting Opens the Dialog box Cutting class, where you can assign a cutting type to the component. Component parts sharing the same cutting are modified in the Cutting dialog box according to the type of joint. If a transom and mullion butt against each other, they must be assigned the same cutting. You will find further information in Sections Cutting class andBar joint manager.
Item Opens the Dialog box Item, where you can select an item number. You will find a detailed explanation on items in the Chapter Item.
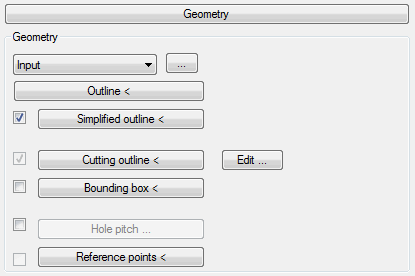
Drop-down menu Geometry
db_ath_bar_edit_geometrie
Above the dialog box section Geometry ATHENA shows warnings and notices. For example, when a component has not yet been assigned any outline.
Type list Defines the component types. Depending on the type, by clicking the button [...] a dialog box is opened where you can modify the properties of the active component. The following component types are possible:
Input Block or enclosed polyline outline from the drawing.
Outlines You will find further information in the ChapterOutline.
Sheet metal You will find further information in the ChapterSheet metal section.
Gasket You will find further information in the ChapterGasket.
Spacer You will find further information in the ChapterSpacer.
Insulation You will find further information in the ChapterInsulation.
Seal You will find further information in the ChapterSeal.
Membrane You will find further information in the ChapterMembrane.
Glazing axis You will find further information in the ChapterAxis symbol.
Outline < Assigns an outline to the current component. By clicking the button the dialog box is temporarily closed and the following input request appears:
Input request
Select objects:
Use the mouse to select the objects whose outlines are to be assigned to the component part. These can be blocks, ATHENA objects (sheet metal section...), circles or polyline outlines.
Specify component part base point:
Choose a base point for the component with the mouse. This input request does not appear if you have chosen a block when selecting an object, because it has a base point.
Specify assembly base point or [Adopt] <Adopt>:
Use the mouse to select the base point of the assembly.
Choose the option Adopt to accept the base point of the component part.
Simplified outline < Assigns a simplified outline to a component.
The simplified outline is used when you use the Construction display mode for the bar (see section Display modes). It gives faster processing and provides better performance especially when exporting in different formats (e.g. IFC for building models).
By clicking the button the dialog box is temporarily closed and the following input request appears:
Input request
Specify assembly base point:
Use the mouse to select the base point of the assembly.
Select objects:
Use the mouse to choose outlines which you want to use as simplified outlines for the component.
Cutting outline < Assigns a cutting outline to the component.
The cutting outline has two functions: Firstly, it is used to process adjacent components with the same cutting class during the profile cutting. Secondly, the cutting outline is used for calculating the bar diagrams. For this reason the external dimensions of the cutting outline should never be larger or smaller than the enclosing rectangle of the component outline.
If you do not change the cutting outline of components, then the following cutting outlines are used as standard:
• External outline - for components with less than eight sides
• Enclosing rectangle - for components with more than eight sides
By clicking the button the dialog box is temporarily closed and the following input request appears:
Input request
Specify assembly base point:
Use the mouse to select the base point of the assembly.
Select cutting outline:
Use the mouse to choose the outline to be used as the cutting outline for the component.
Edit ... Opens the Dialog box Modify cutting outline, where you can define the cutting outline of the component by parameters. You will find further information on this in the ChapterCutting outline. If the component has been defined as a notched part in Drop-down menu Status, the Dialog box Edit notch is opened. Here, the notch distances can be specified to enlarge the notch. You will find further information in the section Edit notch.
bar_simplified
Display of profiles: Cutting, simplified, full
Bounding box < Assigns a cutting outline to a bounding box.
A bounding box is then needed when neither the enclosing rectangle of the outline nor the cutting outline are suitable for the cutting.
In contrast to the cutting outline the bounding box can be smaller than the enclosing rectangle of the component outline If a bounding box is specified, it has priority for the cutting before all other outlines.
By clicking the button the dialog box is temporarily closed and the following input request appears:
Input request
Specify assembly base point:
Use the mouse to select the base point of the assembly.
Select bounding box:
Use the mouse to choose the outline to be used as the bounding box for the component.
Hole pitch Assigns a regular hole pitch to the component. The button Hole pitch opens the Dialog box Component hole pitch where you can define the hole pitch settings. You will find further information in the section Component hole pitch.
Reference points Defines further reference points, to which, with variable assemblies, other components can be fixed. For this, the dialog box is temporarily closed and the following input request appears:
Input request
Specify assembly base point:
You determine the base point of the assembly.
Specify the reference point or [Next/Remove/eXit] <eXit>:
Define an additional reference point or select an option.
The option Next shows the next reference point.
The option Remove deletes the current reference point.
The option eXit terminates the input request.
In the preview only the reference points of the current component are shown.
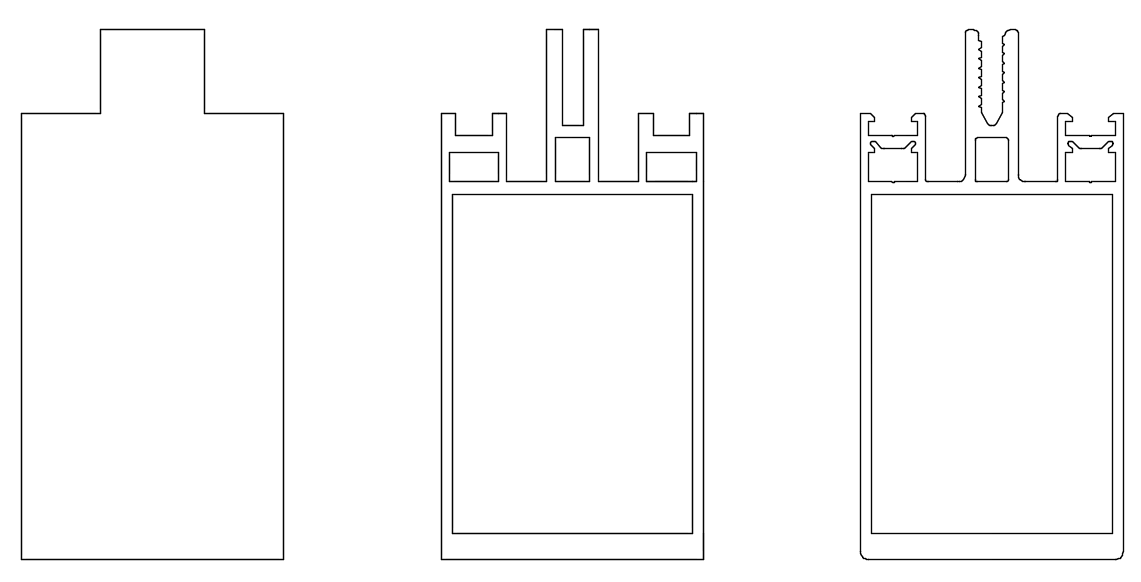
Drop-down menu Position
db_ath_bar_edit_position
Changes the position of the current component within the assembly.
Displacement XY Activates the Cartesian coordinate input for the component displacement.
X Defines the absolute X distance between assembly base point and component base point.
Y Defines the absolute Y distance between assembly base point and component base point.
Displacement -> Activates the polar coordinate input for the component displacement.
-- Defines the absolute distance between assembly base point and component base point.
< Defines the angle between assembly base point and component base point.
Rotation Defines the rotation angle of the component.
Mirror X Mirrors the component in the X direction (not about the X axis!)
Mirror Y Mirrors the component in the Y direction (not about the Y axis!)
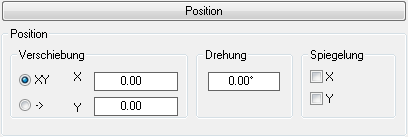
Register button Part status
The section Part status includes a selection menu for selecting a component and the following drop-down menus:
List output Controls the list output for the active component. If you deactivate the tick box, the selected component is not written to the parts list.
Section Controls the generation of the section for the active component. If you deactivate the tick box, the selected component is not taken into account when the section is generated.
As process Controls the processing mode for the active component. When the tick box is activated, the component outline of the components having the same cutting type is subtracted. The contour acts practically as a longitudinal cut.
You can also define the process as a variant and therefore switch it on or off!
Notch Shows the notch mode of the current component. The tick box is activated automatically when you activate the tick box As process for a component with a cutting which is not used for other components.
The notch distances can be adapted in the Dialog box Edit notch. You will find further information in the section Edit notch.
As addition Assigns the current component to another component as an additional part. In the list you can select the component to which you want to assign the additional part.
If a part has been assigned to another one as an addition, both parts are treated as one part. The additional part is not taken into account for the bar cutting.
Drop-down menu Dihedral angle
db_ath_bar_edit_teilestatus_flwinkel
The tick box to the left of the button of the drop-down menu shows whether a component with a dihedral angle has been defined. If you deactivate the tick box, the definition of the dihedral angle is deleted.
Def Defines the current angle of the component.
Variable Activates variable dihedral angle for the component. When the tick box is activated, the button [...] is released.
Min Defines the smallest angle of the component. This is only possible if the tick box Variable is activated.
Max Defines the largest angle of the component. This is only possible if the tick box Variable is activated.
Drop-down menu Stretch
db_ath_bar_edit_teilestatus_strecken
Here, you define components with variable width (definition dimension X) or height (definition dimension Y).
The tick box links from the button of the drop-down menu and shows whether a component has been defined with variable dimensions. If you deactivate the tick box, the dimension definition is deleted.
Dialog box section Definition dimension X and definition dimension Y
Def Defines the actual (current) component dimension.
Variable Activates variable dimensions for the component. When the tick box is activated, the button [...] is released.
Min Defines the smallest admissible component dimension.
Max Defines the largest admissible component dimension.
Drop-down menu Supply
db_ath_bar_edit_teilestatus_lieferung
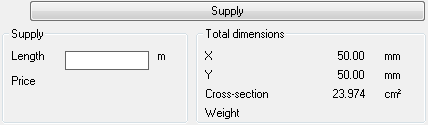
Dialog box section Supply
Shows supplied lengths and prices. This information is displayed when the components have been imported via an interface from a spread-sheet program.
The additional information of dimensions, development and supply are purely informative and have no technical significance.
Dialog box section Total dimensions
Shows the dimensions of the enclosing rectangle as well as the cross section and weight of the current component.
Drop-down menu Surface
db_ath_bar_edit_teilestatus_oberflaeche
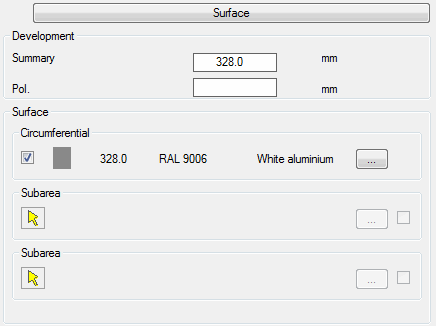
Dialog box section Development
Defines values for the development, which, for example, can be used for calculating the surface treatment (color, process...).
Total Defines the whole surface. This value is calculated, but can be overwritten (e.g. for allowances).
Pol Defines the surface of the sub-area (s)
Dialog box section Surface
Circumferential Activate the tick box to assign a surface treatment (color, process...) to the circumferential area. To do this, the Dialog box Surface manager is displayed. You will find further information on this in the section Surface manager.
Sub-area Defines sub-areas with surface treatment. You can specify a maximum of two sub-areas per profile for a surface treatment.
To do this, click on the arrow and define the start and end points and the side of the surface in the preview. Here too, the Dialog box Surface manager is shown to assign a surface treatment.
You can either define circumferential areas or sub-areas.
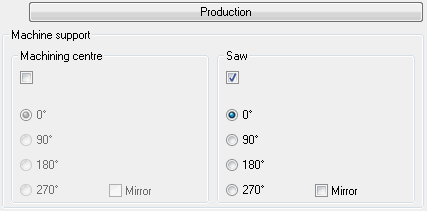
Drop-down menu Production
db_ath_bar_edit_teilestatus_fertigung
Defines how the component is supported on the machining center. You can define two separate machine supports. One for machining centers and one for the saw. You can specify for the output which support is actually used. You will find further information in Sections Bar diagram, Bar list andExport CNC.
Register button Group status
The section Group status contains the following drop-down menus:
Definition size Defines the extension of the bar assembly in the X and Y directions.
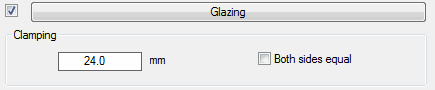
Drop-down menu Glazing
db_ath_bar_edit_gruppenstatus_verglasung
The tick box to the left of the button of the drop-down menu shows whether glazing has been defined. If you deactivate the tick box, the glazing definition is deleted.
Dialog box section Clamping
Defines the assembly as glazing which in which infills can be mounted. You can enter the thickness of the defined infill in the input field. It must be identical to the clamping thickness of the Infill position. You will find further information in the Chapter Axis symbol. If you have activated the tick box Clamping, you can define the properties of the glazing (e.g. various clamping thicknesses) in the section Glazing.
The following conditions must be fulfilled to define glazing. The assembly must consist of referenced components and include an infill position.
Both sides same Prevents different clamping thicknesses for infills being used for right and left. In the Dialog box Parameters for bar assembly with the tick box activated only one menu field is shown where you can specify the clamping for the right and left clamping.
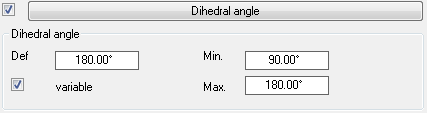
Drop-down menu Dihedral angle
db_ath_bar_edit_gruppenstatus_flwinkel
The tick box to the left of the button of the drop-down menu shows whether a dihedral angle has been defined. If you deactivate the tick box, the definition of the dihedral angle is deleted.
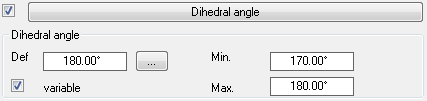
Def Defines the current angle of the assembly.
Variable Activates variable dihedral angle for the assembly. When the tick box Dihedral angle variable is activated, you can define in the section Dihedral angle how the components are to relate to one another for variable dihedral angles.
Min Defines the smallest angle of the assembly. This is only possible if the tick box Variable is activated.
Max Defines the largest angle of the assembly. This is only possible if the tick box Variable is activated.
Drop-down menu Stretch
db_ath_bar_edit_gruppenstatus_strecken
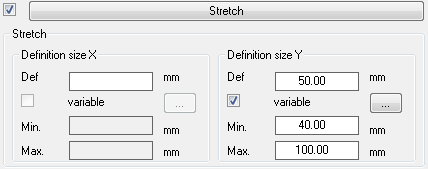
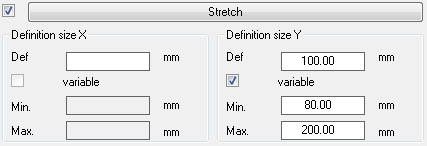
Here, you define assemblies with variable width (definition dimension X) or variable height (definition dimension Y).
The tick box to the left of the button of the drop-down menu shows whether a stretchable assembly has been defined. If you deactivate the tick box, the stretch definition is deleted.
Dialog box section Definition dimension X and definition dimension Y
Def Specifies the defined (actual) width (X) or height (Y) of the assembly.
Variable Activates variable dimensions for the assembly. When the tick box Variable is activated, you can define in the section Stretch how the components are to relate to one another for variable dimensions.
Min Defines the smallest admissible assembly dimension.
Max Defines the largest admissible assembly dimension.
Drop-down menu Strut
db_ath_bar_edit_gruppenstatus_versteifung
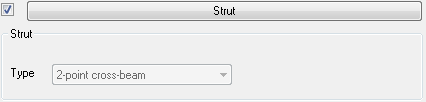
Defines an assembly with a strut. If you have activated the tick box Strut, you can define the properties of the strut in the section Strut.
Drop-down menu Structural analysis
db_ath_bar_edit_gruppenstatus_statik
Dialog box section Total dimensions
Displays the dimensions of the enclosing rectangle of the assembly.
Dialog box section Structural analysis
Defines the Ix and Iy values of the assembly.
This information is purely informative and currently has no technical significance.
Register button Parameter
db_ath_bar_edit_parameter
The section Parameter is dynamic. There are different types of assemblies having different parameters which can be set:
Shows all components in the assembly. Here, you mark the component for which you want to define variants.
Component may be omitted Defines that the component can be omitted when used as a variant.
Dialog box section Variants
Shows the variants for the part marked in the dialog box section Component parts.
Add Specifies a component as a variant. For this, the Dialog box For object selection is opened, where you can select an assembly. You will find further information on this in the Chapter Object selection.
Remove Removes the marked variant from the list.
Dialog box section Displacement
Displacement XY Activates the Cartesian coordinate input for the component displacement.
X Defines the absolute X distance between the defined component and the variant.
Y Defines the absolute Y distance between the defined component and the variant.
Displacement -> Activates the polar coordinate input for the component displacement.
-- Defines the absolute distance between the defined component and the variant.
< Defines the angle between the defined component and the variant.
Dialog box section Rotation
Defines the rotation of the variant.
Dialog box section Mirror
X Mirrors the variant in the X direction.
Y Mirrors the variant in the Y direction.
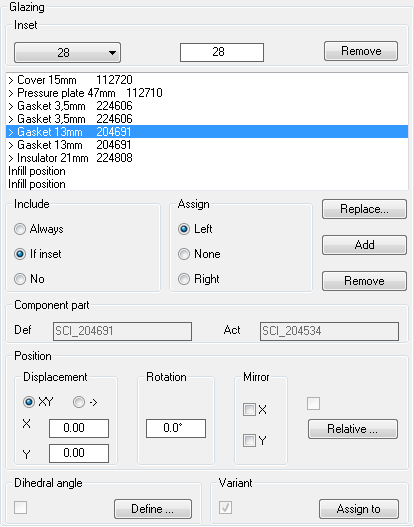
Dialog box section Glazing
db_ath_bar_edit_parameter_verglasung
Dialog box section Clamping
Shows the available clamping thicknesses in a list. Here, you select an clamping thickness to adapt further properties. In the input field you can specify new clamping thicknesses.
Remove Removes the current clamping thickness from the list.
The component list lists all parts defined in the assembly. Here, you select the component whose properties you want to adapt to the current clamping thickness.
Replace Replaces the component for the current clamping thickness. The Dialog box For object selection is opened to select the component. You will find further information on this in the Chapter Object selection.
Add Supplements a component for the current clamping thickness. The Dialog box For object selection is opened to select the component. You will find further information on this in the Chapter Object selection.
Remove Removes the selected component for the current clamping thickness.
Dialog box section Include
Always Defines that the marked component is always used.
If clamping Defines that the marked component is used only for clamping.
No Defines that the marked component is not used for the current clamping thickness.
Dialog box section Assignment
Left Assigns the current component to the left clamping section.
None Does not assign the current component to any side.
Right Assigns the current component to the right clamping section.
Dialog box section Component
Def Shows the name of the component selected for the defined clamping thickness.
Act Shows the name of the component selected for the current clamping thickness.
Dialog box section Position
Moves the component for the current clamping thickness.
Dialog box section Displacement
Displacement XY Activates the Cartesian coordinate input for the component displacement.
X Defines the absolute X distance between the defined component and the component selected for the current clamping thickness.
Y Defines the absolute Y distance between the defined component and the component selected for the current clamping thickness.
Displacement -> Activates the polar coordinate input for the component displacement.
-- Defines the absolute distance between the defined component and the component selected for the current clamping thickness.
< Defines the angle between the defined component and the component selected for the current clamping thickness.
Dialog box section Rotation
Defines the rotation of the component selected for the current clamping thickness.
Dialog box section Mirror
X Mirrors the component selected for the current clamping thickness in the X direction.
Y Mirrors the component selected for the current clamping thickness in the Y direction.
Dialog box section Dihedral angle
Define Opens the Dialog box Define dihedral angle, where you can define dihedral angles. This button is only released when the components within the assembly have been inserted as references. You will find further information in the Chapter Define dihedral angle.
Dialog box section Variant
Assign to Opens the Dialog box Assign variants, where you can define component variants. This button is only released when the components within the assembly have been inserted as references. You will find further information about variants in the chapter Variants.
Dialog box section Strut
db_ath_bar_edit_parameter_versteifung
Construction Here, there is the possibility of selecting the desired type of construction from the pull-down menu. Previously defined types are:
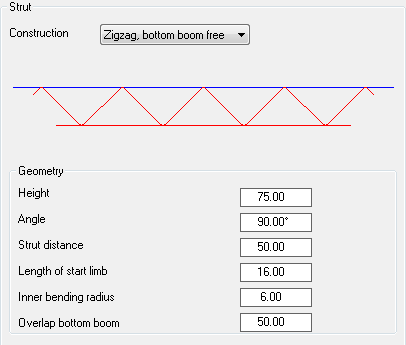
Zigzag, bottom boom free This type consists of two parallel axes which are joined together by a zigzag shaped strut (braces). With this type of construction the two axes can be of different length. This is set via specification of the overlap for the bottom boom.
Zigzag, bottom boom fixed This type consists of two parallel axes which are joined together by a zigzag shaped strut (braces). With this type of construction the two axes are of equal length.
Cross-beam This type consists of an axis which is joined to the bottom boom by a strut in the middle. The bottom boom and the bracing adapt automatically via Height and Inset bottom boom, irrespective of the length of axis.
Cross-beam 3-part This type consists of an axis which is joined to the bottom boom by two struts. The struts are distributed in the ratio 1:3.
Dialog box section Geometry
Here, the design parameters for the selected construction can be adapted appropriately to the structural requirements. The respective required input fields are released depending on the selected construction.
Height This designates the distance between the main axis (bar) and the bottom boom.
Angle This designates the included angle of the zigzag shaped strut.
Strut distance This designates the distance from the end of the axis to the start of the zigzag shaped strut.
Length of start limb This is the length of the first element of the zigzag shaped strut.
Inner bending radius This is the inner bending radius of the zigzag shaped strut.
Overlap bottom boom This is the distance from the end of the axis of the bottom boom to the start of the zigzag shaped strut.
Bottom boom inset This is the distance between the end of the axis and the start of the bottom boom.
Note
• This only affects the types of construction Cross-beam and Cross-beam 3-part.
• The values entered here are implemented in the symbolic graphics.
Dialog box section Stretch
db_ath_bar_edit_parameter_strecken
Dialog box section Component parts
Lists the components of the assembly. Here, you mark a component to adapt its stretching properties.
Upwards Moves the marked component upwards.
Downwards Moves the marked component downwards.
The order of the components affects the behavior of the assembly. The component which does not change its position in the assembly forms the main reference object and must be located in the first position. All components located beneath it can only draw on components situated above it.
Dialog box section Stretch X
Here the behavior of the selected component for a change in width of the assembly in the X direction is defined.
Fixed This button causes the component to remain unchanged in its dimensions and position.
Displace This causes the component to be displaced by the factor specified under Proportion during a width change of the assembly in the X direction.
Only components can be displayed which themselves are not variable.
Stretch If this tick box is activated, the selected component is scaled by the factor specified under Proportion during a width change of the assembly in the X direction.
Proportion This specifies the proportion in %, possessed by the selected component, of the total dimensional change of the assembly.
For Stretch Y the procedure is analogous to Stretch X.
Dialog box section Base point
Defines the base point of the selected component within the assembly. The action defined under Stretch X/Y becomes effective from this point onwards.
Dialog box section Reference object
Selects the component on which the selected component is directly dependent during a change of dimension of the assembly. Furthermore, using the pull-down menu, the point is selected here from which the action defined under Stretch X/Y acts on the subordinate component.
Using Test in the Dialog box Parameters for bar assembly a check can be made of whether the parameters defined in the dialog box for the desired reaction of the assembly have been correctly entered.
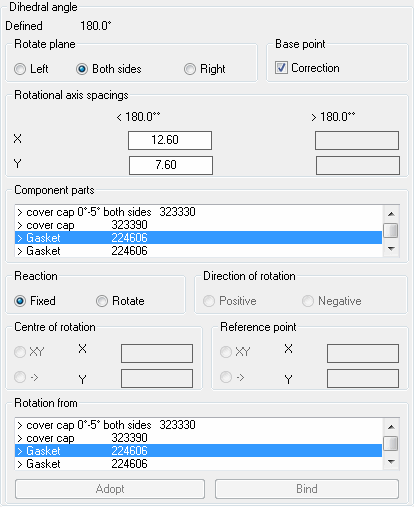
Register button Dihedral angle
db_ath_bar_edit_flaechenwinkel
Dialog box section Dihedral angle
The defined dihedral angle is shown at the upper left.
Left Rotates only the left plane.
Both sides Rotates the left and right planes.
Right Rotates only the right plane.
Correction Activates the angle-dependent correction of the base point.
< 180° Defines the distance of the base point from the rotation point of the plane for angles less than 180°.
>180° Defines the distance of the base point from the rotation point of the plane for angles greater than 180°.
Dialog box section Component parts
Shows all components defined in the assembly. Here you can select the components for defining their reaction.
Dialog box section Reaction
Fixed Causes the marked part to retain its position.
Rotate Causes the marked part to be rotated. When you activate this option, further input fields are released.
Dialog box section Direction of rotation
Positive Rotates the marked component in the positive direction of rotation.
Negative Rotates the marked component in the negative direction of rotation.
Dialog box section Center of rotation
XY Defines the rotation point by the entry of Cartesian coordinates. Enter the X and Y values in the appropriate input fields.
-> Defines the rotation point by the entry of polar coordinates Enter the length and angle in the appropriate input fields.
The dimensions entered here describe the position of the center of rotation relative to the base point of the assembly. This base point is located at the point of intersection which arises through the dihedral angle of the defined reference points of the components. You should first access the dimensions required for the definition in the assembly inserted into the drawing.
Dialog box section Reference point
XY Defines the reference point by the entry of Cartesian coordinates. Enter the X and Y values in the appropriate input fields.
-> Defines the reference point by the entry of polar coordinates Enter the distance and angle in the appropriate input fields.
The reference point describes the point of the center of rotation of the assembly relative to the system point of the component. With many profile systems the system point lies at the level of the glass support without gasket. The base point of the assembly is determined anew from the reference point depending on the dihedral angle of the assembly, so that the assembly is correctly positioned.
Dialog box section Rotation from
If the parameters of the primary components have been defined and tested, dependent parts of the assembly can be conveniently integrated here. To achieve this, first the primary component is selected in the dialog box Components. Then the part dependent on the primary component is marked in this dialog box.
Adopt Transfers the parameters of the primary component to the selected component.
Bind Binds the marked component to the primary component.
The reaction of the assembly can be checked at any time with the Test function.
End of program
OK Saves the current settings and terminates the dialog box.
Only the settings are saved in the dialog box so that you find the same status on restarting the Bar assembly manager.
The current bar assembly is not automatically saved!
Cancel Terminates the dialog box without saving changes.