Defines properties for the job-related bar diagram.
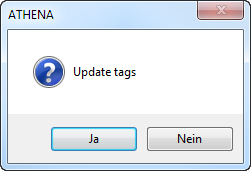
When you run the command, you may be prompted to update identifiers:
db_ath_tags_update
This happens if you have carried out a common part recognition with the command Assign tags. Identifiers should be updated if dimensional changes have occurred. If in doubt, we recommend that you always update the identifiers, otherwise errors may occur in the BOM.
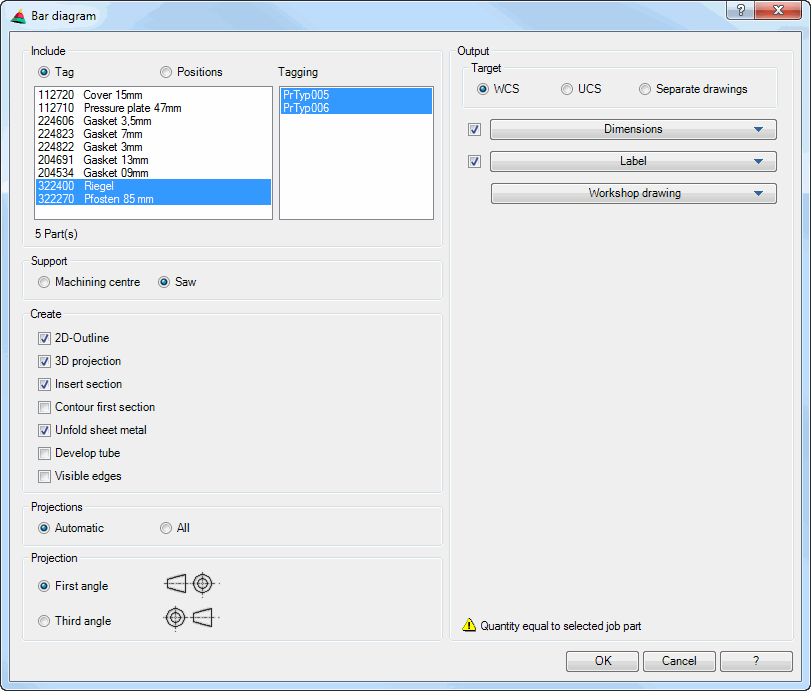
Dialog box Bar diagram (job-related)
db_ath_st3d_bar_draw
Dialog box section Analyze
Tagging Generates bar diagrams according to type. During labeling the quantity of the relevant type is specified.
Positions Generates bar diagrams according to position number.
List Shows the existing bars. Here you can select one or several bars for the diagram. If you have selected the Tagging option, the tags (types) are listed. If you have selected the Positions option, the position numbers of the bars are listed.
Dialog box section Support
Machining center Uses the machine support, which was set for the CNC machining center (CMC), for calculating the diagrams.
Saw Uses the machine support, which was set for the saw, for calculating the diagrams.
Dialog box section Create
2D Outline Generates 2D outlines. These are calculated from the viewed sides of the cutting outlines of the selected bar components.
3D Projection Creates projections. These are derived from the solids of the selected bar components.
For 3D projections the full solids of the bar components are always used. The current Display modes of the bars are not taken into account!
Insert section Inserts sections of the selected bar components. The sides of the views are numbered.
Contour first section Supplements the views with an outline representing the first saw cut.
Unfold sheet metal Develops sheets when the source of the sheet outline is a sheet metal section.
Develop tube Develops tubes (only round cross-sections, no square or rectangular hollow profiles). The source of the tube outline must be a Standard Part or Semi-finished product.
Visible edges Creates 2D outlines with visible edges.
Dialog box section Projections
Automatic Produces an automatically calculated number of views. The number of views depends on the type and complexity of the cuttings and processes on the bar.
All Produces all views.
You should activate this option when the automatic views are not enough for some reason.
Dialog box section Projection
First angle Produces diagrams according to Projection Method 1 to DIN ISO 5456, formerly designated Method E (European) or First Angle Projection.
Third angle Produces diagrams according to Projection Method 3 to DIN ISO 128-30, formerly designated Method A (American) or Third Angle Projection.
Dialog box section Target
WCS Produces diagrams in the World Coordinate System (X/Y plane) of the current drawing.
UCS Produces diagrams inn the User Coordinate System (X/Y plane) of the current drawing.
When you use the options WCS or UCS and terminate the dialog box with OK, you can insert the selected bar components consecutively into the drawing.
Unit drawing Produces the diagrams in separate drawings for each bar. You can carry out settings for the file (name, storage location, etc.) in the Drop-down menu Workshop drawing.
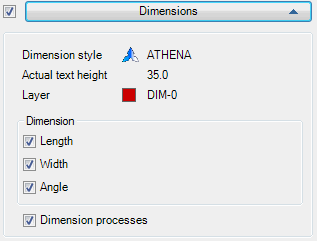
Drop-down menu Dimensions
db_ath_st3d_bar_draw_bemassung
The switch to the left of the drop-down menu activates dimensioning. Important dimension settings (dimension style, actual text height and dimension layer) are displayed for information.
Dialog box section Dimension
Length Dimensions the length of the bar.
Width Dimensions the width of the bar.
Angle Dimensions the trim angle of the bar.
Dimension processes Dimensions processes on bars.
Per process one dimension chain is generated, beginning at the start of the bar. Identical processes, which are aligned, are dimensioned with one dimension chain. Dimensioning occurs according to the center of gravity of the process. The process outline is not dimensioned. Drilled holes and slotted holes are labeled.
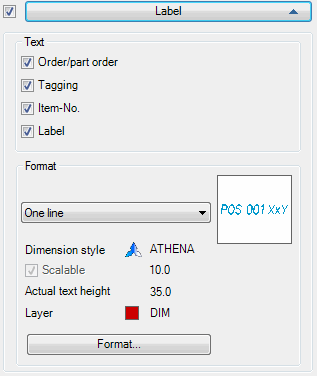
Drop-down menu Label
db_ath_st3d_bar_draw_beschriftung
The switch to the left of the drop-down menu activates the diagram labeling.
Dialog box section Text
Job/job part States the job designations in the label text.
Position States the position number in the label text.
Item States the item number in the label text.
Labeling States the component designation in the label text.
Dialog box section Format
The list contains various label symbols. You can either select a symbol directly from the list or open the Dialog box Symbol selection by clicking the symbol preview and selecting a symbol there.
Dimension style Displays the current dimension style for information.
Scalable Indicates whether the current dimension style is of the Label type.
Actual text height Displays the actual text height for information.
The effective text height is calculated from the text height of the dimension style and the label scale or the scaling of the dimension.
Layer Displays the current layer for information.
Format Opens the Dialog box Leader, where you can adapt the symbol settings. You will find further information in the ChapterLeader.
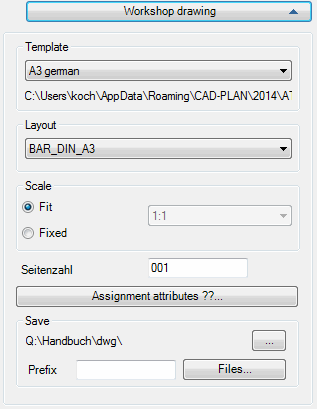
Drop-down menu Workshop drawing
db_ath_st3d_bar_draw_werkstattzeichnung
Dialog box section Template
Displays the template drawings. You can choose the required template from the list.
The complete path for the template drawing is shown below the pick list.
Templates for diagrams can be adapted. You can create and use your own template files. In order to be able to use templates for bar diagrams, you must keep to the following conventions:
• File name - ath_work_xxx, whereby xxx can be any character string.
Shows available layouts of the selected template. You can choose the required layout from the list.
Dialog box section Scale
Fit Scales the viewport scale such that the complete bar diagram is visible.
Fixed Activates the selection menu for scales where you can define a fixed scale for the viewport scale.
Number of pages Specifies the page number for the first workshop drawing. The page number can be written in the caption via attribute assignment and is incremented.
Assign attributes Assigns fixed texts (e.g. job number, editor, file name, etc.) to the attributes of the single drawings. To do this the Dialog box Assignment of attributes is started.
Dialog box section Save
Specifies the storage location for the workshop drawings. The current storage location is displayed.
[...] Starts the dialog box Browse for folder. Here you can select the folder in which you want to save the workshop drawings.
Prefix Defines the file prefix for the workshop drawings. The file name comprises: the prefix, job designation and part number from the positioning. If no positioning has been carried out, the file name is generated automatically.
Files Starts the Files dialog box and gives information about the available drawings (*.dwg) of the set folder.
End of program
If you quit the dialog box with OK, the bar diagrams are generated. If they generate workshop drawings, they are automatically saved. If you insert the bar diagrams into the WCS or UCS of the drawing, then follows:
Input request
Specify insertion point:
Use the mouse or enter co-ordinates to specify an insertion point for the cutting outline.
Specify rotated angle<0>:
Determine the rotation angle of the cutting outline.
Press the Enter key to accept the default angle.
These two queries are repeated until the cutting outlines of all selected bar components have been inserted into the drawing.
Note: This function generates production drawings (diagrams) of bars, optionally with additional details. All the data produced are to be checked by the user. CAD-PLAN GmbH can in no way be held liable for the results of this function and any errors and losses arising from it.