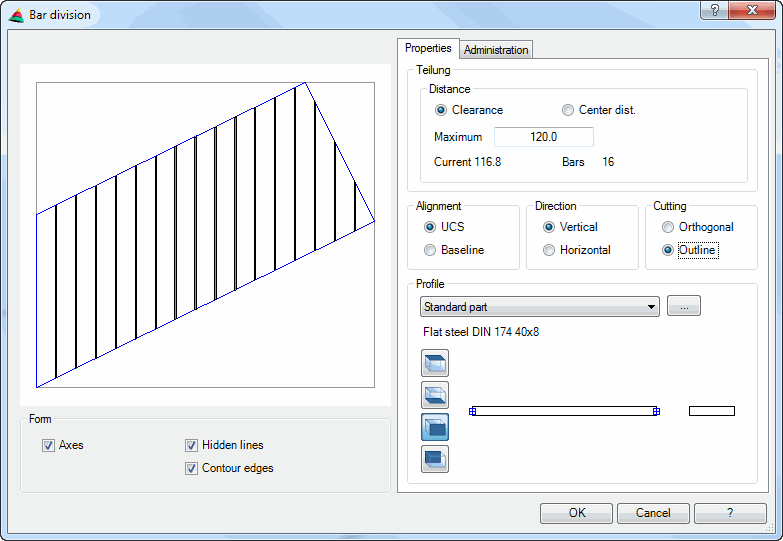
The preview shows the selected area with the bar division. It provides a visual check of the settings made.
Dialog box section Display
Axes Turns center lines of the bars on or off.
Hidden lines Switches the hidden lines on or off.
Contour edges Switches the contour edges for profiles on or off. The tick box only has an effect for profiles with rounding. For example, if you insert the plan view of a steel U-section.
Operating section
Tab Properties
Dialog box section Division
Clearance dimension Calculates the distances between the bars according to the clearance dimension.
Center distance Calculates the distances between the bars according to the center distance.
Maximum Defines the maximum distance (clearance dimension or center distance, i.e. unit spacing). The actual distance is calculated from this value and the size of the area.
Current Shows the calculated, actual spacing between the bars. The actual spacing is the largest possible distance between the bars below the defined maximum distance.
Bars Shows the calculated number of bars. It arises from the defined distance and the size of the area.
Dialog box section Alignment
UCS (OCS) Aligns the bars according to the User Coordinate System (UCS). During editing the Object Coordinate System (OCS) of the outline is shown instead of the UCS. This corresponds to the UCS which was active when the bar division was generated.
Baseline Aligns the bars according to a baseline of the outline. You can click the baseline directly in the preview. The selected baseline is shown in red.
Dialog box section Direction
Vertical Aligns the bars vertically to the UCS (OCS) or to the baseline.
Horizontal Aligns the bars horizontally to the UCS (OCS) or to the baseline.
Dialog box section Cutting
Orthogonal Generates bars with an orthogonal cutting.
Outline Generates bars with a cutting on the external outline of the surrounding area.
Dialog box section Profile
Here you can choose the profile for the bar division. Possible profiles are standard parts and semi-finished products.
Using the view buttons, you can select whether the bars are inserted as a plan view, bottom view or a view from the right or left. You see the selected view directly in the profile preview.
You will find further information in the section Object views.
Tab Manager
You will find a detailed description of the Administration section in the Chapter Management of objects.
End of program
Click OK to terminate the dialog box. The bar division is inserted directly into the selected area.
Cancel closes the dialog box and all settings are discarded.
Editing the bar division
To make changes to the division you can double click an existing bar division or select it with the command Modify object. Changes can then be made in the Dialog box Bar division.
Output of the bars
To obtain an output of the bars (bar diagrams or lists), you have to carry out the following two tasks:
1. Object to solid body With this command the bar division is converted from 2D to 3D.
This conversion should only occur when no further changes are made, because it is undone again when a modification is made (e.g. by double click).
2. Explode ATHENA With this command the bar division is resolved into single bars (3D). You can now output these bars just like other bars with the following commands: